Andrej Tozon's blog

In the Attic

NAVIGATION - SEARCH

Text-To-Speech with Windows 10 IoT Core & UWP on Raspberry Pi Part 2

In my previous post, I've written about using Raspberry Pi running Windows 10 IoT Core for Text-To-Speech services for my smart home. As I've mentioned in that post, I have speakers in two floors wired to an amplifier, connected to a Raspberry Pi. The thing is that each of the speakers is wired to its own audio channel - ground floor speaker is wired to the left and 1st floor speaker is wired to the right channel. It may not be what you'd call a true stereo when listening to music, but it plays a big deal with speech running through the house. With such wiring, I can target the floor I want to convey the speech through, exclusively or with subtle mix, e.g. 100% volume to ground floor and only 10% to 1st floor (it's basically how audio balancing works). This basically lets me cover these use cases and more:

  • Want to call your children that are playing in their rooms upstairs, to lunch? Use 1st floor speaker.
  • Somebody at the door? Send the message to upstairs and ground floor speakers equally.
  • Late at night, kids are sleeping? Maybe use ground floor speakers at full and upstairs speakers at a minimum?
  • Etc...

Scenarios are limitless. And the MediaPlayer class from my previous example offers just what I needed to implement this - audio balance. You can simply set the balance prior to playing your audio, like this:

public async Task SayAsync(string text, double balance)
{
    speechPlayer.AudioBalance = balance;
    using (var stream = await speechSynthesizer.SynthesizeTextToStreamAsync(text))
    {
        speechPlayer.Source = MediaSource.CreateFromStream(stream, stream.ContentType);
    }
    speechPlayer.Play();
}
This code is from my previous blog post, with additional parameter for setting the AudioBalance property prior to playing the synthesized speech.

Playing speech remotely

Of course the real fun begins when you're able to control your audio player remotely, e.g. from an application or even web browser. To achieve this, I have put together a simple "web server" that runs as a background service on Windows 10 IoT Core. I've used the SimpleWebServer from IoTBlockly code sample as a base for my own implementation of a "poor man's Web API server", just trying to simulate controllers, etc. I won't go into that code as it's very hacky, absolutely not production ready, complete or even tested, but it appears to work OK for my current needs. Full source code I've used for this blog post is included in my sample project; I'm only listing the part that controls the speech here:

internal class SayController : Controller
{
    private readonly SpeechService _speechService;
    public SayController(SpeechService speechService)
    {
        _speechService = speechService;
    }
    public async Task<WebServerResponse> Get(string text, string floor)
    {
        if (string.IsNullOrEmpty(floor)) { await _speechService.SayAsync(text, 0) } else if (floor.ToLower() == "up")         {
            await _speechService.SayAsync(text, -1);
        }
        else
        {
            await _speechService.SayAsync(text, 1);
        }
        return WebServerResponse.CreateOk("OK");
    }
}
The code is pretty much self explaining - the first parameter contains the text that should be spoken and the second parameter is the name of the floor the text should be spoken on ("up" sets the audio balance to the left channel and "down" to the right).

With such server set up on Raspberry Pi (the sample is set to listening on port 8085), it's easy for me to make my home say the synthesized text on a specific floor by simply calling its URL:

http://<IP>:8085/say?text=Hello&floor=up

Sample source code for this post is available on GitHub.

Text-To-Speech with Windows 10 Iot Core & UWP on Raspberry Pi

One of the best features I’ve found in using Windows 10 IoT Core on my home Raspberry Pi (which is a small, inexpensive piece of hardware) is, it can do voice synthesis very well (i.e. it can “speak”). While Windows developers could develop applications with this same functionality for quite a long time, I was still overwhelmed when I saw such small device say anything I ordered it to. It currently may not support all the options and voices older platforms do, but it’s more than enough for scenarios like home automation, notifications, etc. The fact that Windows 10 IoT Core even supports Cortana means Microsoft has big plans for IoT Core and voice recognition an synthesis.

When building my house a few years ago, I’ve put in a pair of audio cables going to both of two floors, to be later able to install two small (but powerful) speakers into a central ceiling of each floor. A private little whole house audio/ambient music system, if you will. I’ve plugged them into an amplifier installed in my utility room and connected to a Raspberry Pi running Windows IoT Core. [Sure, it’s all possible and doable wireless as well, but I’d still trust wired installations over wireless, so if given a chance, I’d pick wires anytime].

Windows 10 IoT Core

So Why Windows IoT Core? Just because it could run Windows Universal apps (where speech synthesis was supported) and I’ve already known UWP very well and have worked with the API several times in the past - it was a perfect fit.

Having wired my whole house audio system to Raspberry Pi gave me quite a few gains:

  • telling time – my house reports the time every hour, on the hour. I’ve got quite used to this in the past two years, as it’s quite useful to keep track of time, especially when you’re busy; it’s really nonintrusive.
  • status notifications – I have my whole house wired and interconnected with my smart home installation so anything important I don’t want to miss (like low water level, motion detection, even weather report) can be reported audibly, with detailed spoken report;
  • door bell – I also have my front door bell wired to the Raspberry Pi. It can play any sound or speech when somebody rings a bell;
  • calendar – every morning, shortly before it’s time to go for work or school, I can hear a quick list of activities for that day – kids’ school schedule, any scheduled meetings, after-school activities, … along with weather forecast;
  • background music – not directly speech related, but Raspberry Pi with Windows IoT is also a great music player. Scheduled in the morning for when it’s time to get up, it quietly starts playing the preset internet radio station.

These are just a few examples of how I’m finding Windows 10 IoT Core speech capabilities on Raspberry Pi useful and I’m regularly getting ideas for more. For this blog post, however, , I’d like to focus on showing how easy it is to implement the first case from the above list – telling time – using Visual Studio to create a background Universal Windows Application and deploy it to Raspberry Pi running Windows 10 IoT Core.

Development

What I’ll be using:

  • Visual Studio 2017 – see here for downloads,
  • Raspberry Pi 3 with latest Windows 10 IoT Core installed – see here for download and instructions on how to install it.

I’ll also be using the Background Application IoT Visual Studio template. To install IoT Core templates, install Windows IoT Core Projects extension using the Extensions and Updates menu option:
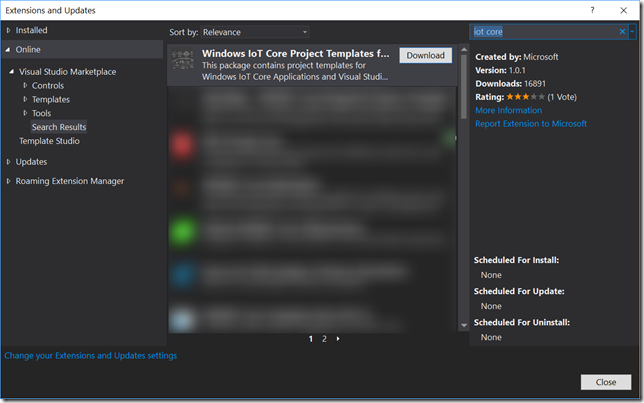
image

After that (possibly restart Visual Studio – installing may also take some time for additional downloads), create a new IoT project  (File | New | Project…):
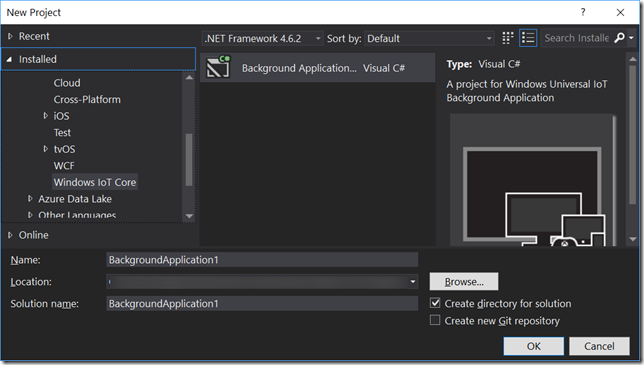
image

Select the Windows IoT Core template group on the left and pick the only template in that group – Background Application (IoT). Enter a project name and Click OK to create the project.

After project is created, add the BackgroundTaskDeferral line to prevent background service exiting too early:

private BackgroundTaskDeferral deferral;
public void Run(IBackgroundTaskInstance taskInstance)
 {
     deferral = taskInstance.GetDeferral();
}

Then add the following class:

internal class SpeechService
{
    private readonly SpeechSynthesizer speechSynthesizer;
     public SpeechService()
     {
         speechSynthesizer = CreateSpeechSynthesizer();
     }
    private static SpeechSynthesizer CreateSpeechSynthesizer()
     {
     }
}

This is just an internal class that currently does nothing but trying to create a class called SpeechSynthesizer.

SpeechSynthesizer

The SpeechSynthesizer class has been around for quite a while and in various implementations across different frameworks. I’ll use the one what we’ve currently got on Windows 10 / UWP, where it sits under the Windows.Media.SpeechSynthesis namespace.

In the above code, something’s missing – the code that actually creates the SpeechSynthesizer object. Turns out it’s not very difficult to to that:

var synthesizer = new SpeechSynthesizer();
return synthesizer;

But there’s more… First, you can give it a voice you like. To get the list of voices your platform supports, inspect the SpeechSynthesizer.AllVoices static property. To enumerate through all the voices you can use this:

foreach (var voice in SpeechSynthesizer.AllVoices)
{
     Debug.WriteLine($"{voice.DisplayName} ({voice.Language}), {voice.Gender}"); }

The above code would vary depending on which language(s) you have installed. For example, English language only would give you:

Microsoft David Mobile (en-US), Male
Microsoft Zira Mobile (en-US), Female
Microsoft Mark Mobile (en-US), Male

Also note that not all languages support speech synthesis. To add one or check what’s supported, go to Region & Language settings and click on the language you want to add speech support for. Example for German:
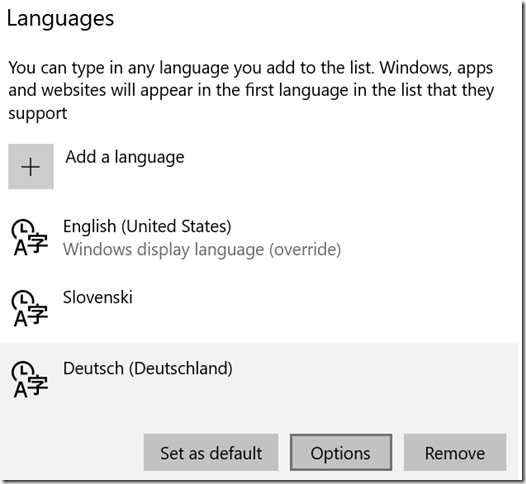
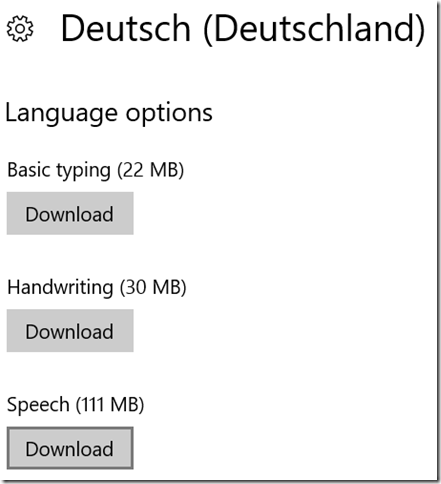
image image

As you can see, speech data for German takes about 111 MB to download. Once it is installed, it’ll appear on the list.

If you don’t like the default voice, you can either pick another one based on its ID or one of its attributes like gender or language; the following code snippet pick the first available female voice or falls back to the default voice if no female voices were found:

var voice = SpeechSynthesizer.AllVoices.SingleOrDefault(i => i.Gender == VoiceGender.Female) ?? SpeechSynthesizer.DefaultVoice;

The DefaultVoice static property will give you the default voice for the current platform settings in case your query fails.

When you have your voice selected, assign it to SpeechSynthesizer:

synthesizer.Voice = voice;

What’s Coming with Windows 10 Fall Creators update

There are additional options you can set to SpeechSynthesizer. Adding to existing IncludeSentenceBoundaryMetadata and IncludeWordBoundaryMetadata properties, the forthcoming Windows 10 Fall Creators update is looking to add some new interesting ones: AudioPitch will allow altering the pitch of synthesized utterances (change to higher and lower tones), AudioVolume will be used to individually control the volume and SpeakingRate to alter the tempo of spoken utterances. To try those now, you need to be on latest Windows 10 Insider Preview (Windows 10 IoT Core version is available from here) and at least Windows SDK build 16225.

I’m running the latest stable Windows 10 IoT Core version on my home Raspberry Pi so for now I’ll stick to using the latest stable version of SDK (Windows 10 Creators update or build 15063).

To continue with the code, this is how I’ve implemented the CreateSpeechSynthesizer method:

private static SpeechSynthesizer CreateSpeechSynthesizer()
{
     var synthesizer = new SpeechSynthesizer();
     var voice = SpeechSynthesizer.AllVoices.SingleOrDefault(i => i.Gender == VoiceGender.Female) ?? SpeechSynthesizer.DefaultVoice;
     synthesizer.Voice = voice;
     return synthesizer; }

Speech

It only takes a few lines to actually produce something with SpeechSynthesizer: add a MediaPlayer to the SpeechService class, along with the new SayAsync method:

private readonly SpeechSynthesizer speechSynthesizer;
private readonly MediaPlayer speechPlayer;
public SpeechService()
{
    speechSynthesizer = CreateSpeechSynthesizer();
   speechPlayer = new MediaPlayer();
}
public async Task SayAsync(string text)
{
    using (var stream = await speechSynthesizer.SynthesizeTextToStreamAsync(text))
    {
        speechPlayer.Source = MediaSource.CreateFromStream(stream, stream.ContentType);
    }
    speechPlayer.Play();
}

Let’s take a closer look to the SayAsync method. The SynthesizeTextToStreamAsync method does the actual speech synthesis - it turns text to spoken audio stream. That stream is assigned to MediaPlayer’s Source property and played using the Play method.

Easy.

Ready to tell time

We need another method for telling time, here’s an example:

public async Task SayTime()
{
     var now = DateTime.Now;
     var hour = now.Hour;
    string timeOfDay;
     if (hour <= 12)
     {
         timeOfDay = "morning";
     }
     else if (hour <= 17)
     {
         timeOfDay = "afternoon";
     }
     else
     {
         timeOfDay = "evening";
     }
    if (hour > 12)
     {
         hour -= 12;
     }
     if (now.Minute == 0)
     {
         await SayAsync($"Good {timeOfDay}, it's {hour} o'clock.");
     }
     else
     {
         await SayAsync($"Good {timeOfDay}, it's {hour} {now.Minute}.");
     } }

And the last thing to add is a way to invoke the above method on proper intervals. This is my full StartupTask class for reference:

public sealed class StartupTask : IBackgroundTask
{
     private BackgroundTaskDeferral deferral;
     private Timer clockTimer;
     private SpeechService speechService;
    public void Run(IBackgroundTaskInstance taskInstance)
     {
         deferral = taskInstance.GetDeferral();
        speechService = new SpeechService();
        var timeToFullHour = GetTimeSpanToNextFullHour();
         clockTimer = new Timer(OnClock, null, timeToFullHour, TimeSpan.FromHours(1));
        speechService.SayTime();
     }
    private static TimeSpan GetTimeSpanToNextFullHour()
     {
         var now = DateTime.Now;
         var nextHour = new DateTime(now.Year, now.Month, now.Day, now.Hour, 0, 0).AddHours(1);
         return nextHour - now;
     }
    private async void OnClock(object state)
     {
         await speechService.SayTime();
     } }

Timer will fire every hour and your device will tell the time. Feel free to experiment with other shorter time spans to get hear it tell the time more often.

Deploying to a device

There are many ways to deploy your app to an IoT Core device, but I usually find it easiest to deploy from within Visual Studio.

Open project’s Property pages and select Debug page. Find the Start options section, select Remote Machine as Target Device and hit the Find button. If your device is online, it will be listed in the Auto Detected  list. Select it, leaving Authentication Mode to Universal.

image

Select Debug | Start Without Debugging or simply press  CTRL+F5 to deploy application without debugger attached. With speakers or headphones attached to the device, you should hear the time immediately after application is successfully deployed.

You can also check the application status on the Windows Device Application Portal:

image

Hit the switch in the Startup column to On if you want the background application automatically start whenever device boots up.

Audio issues

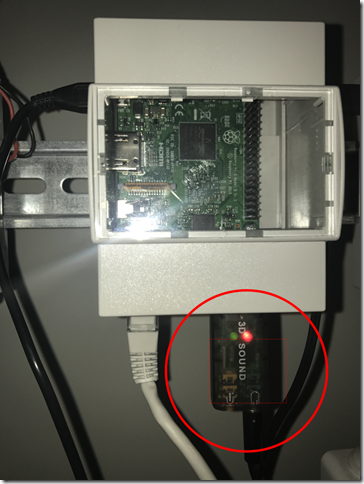
When I first tried playing audio through Raspberry Pi, there were annoying clicks playing before and after voice was spoken. I’ve solved that with a cheap, 10$ USB audio card. Plus I’ve gained a mic input.
image

Wrap up

We’ve created a small background app that literally tells time, running on a number of small devices that support Windows 10 IoT Core. In future posts, I’ll add additional features, some of them I’ve introduced in the beginning of this blog post.

Full source code from this post is available on github.

You can also read part 2 of this post here.

Microsoft Cognitive Services - Computer Vision

Similar to Face API, Computer Vision API service deals with image recognition, though on a bit wider scale. Computer Vision Cognitive Service can recognize different things on a photo and tries to describe what's going on - with a formed statement that describes the whole photo, a list of tags,  describing objects and living things on it, or, similar to Face API, detect faces. It can event do basic text recognition (printed or handwritten).

Create a Computer Vision service resource on Azure

To start experimenting with Computer Vision API, you have to first add the service on Azure dashboard.

Untitled

The steps are almost identical to what I've described in my Face API blog post, so I'm not going to describe all the steps; the only thing worth of a mention is the pricing: there are currently two tiers: the free tier (F0) is free and allows for 20 API calls per minute and 5.000 calls per month, while the standard tier (S1) offers up to 10 calls per second. Check the official pricing page here.

Hit the Create button and wait for service to be created and deployed (should take under a minute). You get a new pair of key to access the service; the keys are, again, available through the  Resource Management -> Keys section.

Trying it out

To try out the service yourself, you can either try the official documentation page with ready-to-test API testing console, or you can download a C# SDK from nuget (source code with samples for UWP, Android & iOS (Swift).

Also, source code used in this article is available from my Cognitive Services playground app repository.

For this blog post, I'll be using the aforementioned C# SDK.

When using the SDK, The most universal API call for Computer Vision API is the AnalyzeImageAsync:

var result = await visionClient.AnalyzeImageAsync(stream, new[] {VisualFeature.Description, VisualFeature.Categories, VisualFeature.Faces, VisualFeature.Tags});
var detectedFaces = result?.Faces;
var tags = result?.Tags;
var description = result?.Description?.Captions?.FirstOrDefault().Text; var categories = result?.Categories;

Depending on visualFeatures parameter, the AnalyzeImageAsync can return one or more types of information (some of them also separately available by calling other methods):

  • Description: one on more sentences, describing the content of the image, described in plain English,
  • Faces: a list of detected faces; unlike the Face API, the Vision API returns age and gender for each of the faces,
  • Tags: a list of tags, related to image content,
  • ImageType: whether the image is a clip art or a line drawing,
  • Color: the dominant colors and whether it's a black and white image,
  • Adult: indicates whether the image contains adult content (with confidentiality scores),
  • Categories: one or more categories from the set of 86 two-level concepts, according to the following taxonomy:

The details parameter lets you specify a domain-specific models you want to test against. Currently, two models are supported: landmarks and celebrities. You can call the ListModelsAsync method to get all models that are supported, along with categories they belong to.

image

Another fun feature of Vision API is recognizing text in image, either printed or handwritten.

var result = await visionClient.RecognizeTextAsync(stream);
Region = result?.Regions?.FirstOrDefault();
Words = Region?.Lines?.FirstOrDefault()?.Words;
The RecognizeTextAsync method will return a list of regions where printed text was detected, along with general image text angle and orientation. Each region can contain multiple lines of (presumably related) text, and each line object will contain a list of detected words. Region, Line and Word will also return coordinates, pointing to a region within image where that piece of information was detected.
Also worth noting is the RecognizeTextAsync takes additional parameters:
language – the language to be detected in the image (default is “unk” – unknown),
detectOrientation – detects the image orientation based on orientation of detected text (default is true).

Source code and sample app for this blog post is available on github.

Microsoft Cognitive Services - playground app

I've just published my Cognitive Services sample app to github. Currently it's limited to Face API service, but I'll work on expanding it to cover other services as well.

The Microsoft Cognitive Service Playground app aims to support:

  • managing person groups,
  • managing persons,
  • associating faces with persons,
  • training person groups,
  • detecting faces on photos,
  • identifying faces.

Basic tutorial

1. Download/clone the solution, open it in Visual Studio 2017 and run.

2. Enter the key in the Face API Key text box. If you don't already have a Face API access key, read this blog post on how to get it.

image

3. Click the Apply button.

4. If the key is correct, you will be asked to persist the key for future use. Click Yes if you want it to be stored in application local data folder - it will be read back every time application is started (note: the key is stored in plain text, not encrypted).

image

5. Click the Add group button.

image

6. Enter the group name and click Add.

image

7. Select the newly created group and start adding persons.

8. Click the Add person button.

image

9. Enter person's name and click Add. The person will be added to the selected group.

image

10. Repeat steps 8 and 9 to add more persons in the same group.

11. Click the Open image button and pick an image with one or more faces on it.

image

12. The photo should be displayed and if any faces were detected, they should appear framed in rectangles. If not, try with different photo.

image

13. Select a person from the list and click on the rectangle around the face that belongs to that person. A context menu should appear.

image

14. Select the Add this face to selected person option. The face is now associated with selected person.

15. Repeat steps 13 and 14 for different photos and different persons. Try associating multiple faces to every single person.

16. Click the Train group button. Training status should appear. Wait for the status to change to Succeeded. Your group is trained!

image

17. Open a new photo, preferably one you haven't use before for training, but featuring a face that belongs to one of the persons in the group. Ensure the face is detected (the rectangle is drawn around it).

image

18. Click on the rectangle and select Identify this face.

image

19. With any luck (and the power of AI), the rectangle will get the proper name tag. Previously unknown face has just got a name attached to it!

image

20. Enjoy experimenting with different photos and different faces ;)

21. Revisit my older blog posts on the subject (here and here).

Microsoft Cognitive Services - Face identification

In today's Cognitive Services post, things are going to get a bit more interesting - we're moving from face detection to face identification. The difference is that we're not only going to detect there is a face (or more faces) present on a photo, but actually identify the person that face belongs to. But to do that, we need to teach the AI about people we'd like to keep track of. Even a computer can't identify someone it has never "seen" and has no information of how they look like.

The Face API identification works on a principle of groups - you create a group of people, attach one ore more faces to each group member, to finally be able to find out if the face on your new photo belongs to any member of that group. [The alternative to groups are face lists, but in I'll stick with groups for now.]

The Face API supports everything you need for managing groups, people and their faces. Here I'm expanding my Universal Windows demo application I've started building in my previous post.

Creating a person group with C# SDK is simple:

await client.CreatePersonGroupAsync(Guid.NewGuid().ToString(), "My family");
CreatePersonGroupAsync method takes a group ID for first parameter (easiest to use is to provide a GUID if you don't have other preferences or requirements), while the second name is a friendly name of the group that can be displayed throughout your app. There's a third - optional - parameter that takes any custom data you want to be associated with the group.

Once you've created one or more group, you can retrieve them using the ListPersonGroupsAsync method:
var personGroups = await client.ListPersonGroupsAsync();

You can start adding people to your group by calling the CreatePersonAsync, which is very similar to the above CreatePersonGroupAsync:

var result = await client.CreatePersonAsync(personGroupId, "Andrej");

The first parameter is the same personGroupId (GUID) I've used with the above method and identifies the person group. The second parameter is the name of the person you're adding. Again, there's a third parameter for optional user data if you want some additional data to associate with that person. The return result object contains a GUID of added person.

And again, you can now list all the persons in a particular group by calling the ListPersonsAsync method:

var persons = await client.ListPersonsAsync(personGroupId);

A quick note here: both ListPersonGroupsAsync and ListPersonsAsync support paging to limit the returned result set.

Once you've added a few persons in a person group, it's time to give those persons faces.

Prepare a few photos of each person and start adding their faces. It's easier to use photos with single person on it to avoid one extra step of selecting particular face on the photo to be associated with a person. If only one face is detected on a photo, that one face will be added to the selected person.

var file = await fileOpenPicker.PickSingleFileAsync();
using (var stream = await file.OpenStreamForReadAsync())
{
    var result = await client.AddPersonFaceAsync(personGroupId, personId, stream);
}

It takes just a personGroupId, personId and a photo file stream for AddPersonFaceAsync method to add a face to a person (personId) in a person group (personGroupId). There are two more parameters though - userData is again used for providing additional data to that face, while the last parameter - targetFace - takes a rectangle with pixel coordinates on the photo that bounds the face you want to add. Also, instead of uploading a photo stream you can use a method overload taking a valid URL that returns a photo containing a person's face.
The returned result of the above method will return the ID of persisted face that was just associated with a person.

To check how many faces are associated with specific person, simply call the GetPersonAsync method:

var person = await client.GetPersonAsync(personGroupId, personId);

The returned person object will contain person's ID, name, user data and an array of persisted faces' IDs.

I've found that adding around 3 faces for a person is good enough for successfully identifying people in various conditions. However, I'd recommend adding faces in different conditions for improved accuracy (summer/winter, different hair styles, lightning conditions, ...) Also, I believe adding a few faces every now and then would help in keeping the data in sync with the latest looks (like when kids are growing up).

Training

Now that we have at least one group with a few persons in it, and every person is associated with a few faces, it's time to train that group.

await client.TrainPersonGroupAsync(personGroupId);

Simply call the TrainPersonGroupAsync method with the group ID to start the training process. How much it takes depends on how many persons are in the group and the number of faces, but for a small(er) amounts it usually takes a few seconds. To check the training status, call the GetPersonGroupTrainingStatusAsync method:

var status = await client.GetPersonGroupTrainingStatusAsync(personGroupId);

The returned status includes an actual field 'status' that indicates the training status: notstarted, running, succeeded and failed. You'll be mostly interested in succeeded and failed statuses. When you get succeeded, it means your data is trained and ready to use. In case of failed something went wrong and you should check another field returned with status - the message field should report what went wrong.

Face identification

Finally, with everything in place, we get to the fun part - identifying faces.

Face identification is a two-way process. First you need to call the Face API to detect faces on your photo, like in. This call will return detected face's ID (or more, if multiple faces were detected). Using that ID you need to call the actual identification API to check if that face matches any of persisted faces in the particular group.    

var file = await fileOpenPicker.PickSingleFileAsync();
Face[] faces;
using (var stream = await file.OpenStreamForReadAsync())
{
    faces = await client.DetectAsync(stream);
} var faceIds = faces.Select(i => i.FaceId).ToArray(); var identifyResults = await client.IdentifyAsync(personGroupId, faceIds); foreach (var identifyResult in identifyResults)
{ var candidate = identifyResult.Candidates.FirstOrDefault(); if (candidate != null) { var person = await client.GetPersonAsync(personGroupId, candidate.PersonId); Console.WriteLine($"{person.Name} was identified (with {candidate.Confidence) confidence!"); } }

In the above code snippet, three API methods are marked bold: DetectAsync detects faces in the photo (see previous post for more info). It will return face detected face IDs we need for the next call (note: face IDs are stored on servers for 24 hours only, after that they will no longer be available). Taking those IDs, we call the IdentifyAsync metod, also providing the personGroupId. The Face API service will then take provided face IDs and compare those faces with all the faces in the group to return results. The results contain an array of candidates for each face match; having a candidate doesn't necessarily mean we got a perfect match! We can check candidate's Confidence property that return the match confidence score - higher it is, more we can trust the resulting match). To finally get to the name of the person identified, we call the GetPersonAsync method with the identified person's ID.

That's it for person, groups and faces management and basic face identification. I'll get to the more practical examples of face identification in the next posts. 

Also check out the sample code on github.

Microsoft Cognitive Services - using a Face API SDK

Once you have a Microsoft Cognitive Services Face API set up (see previous post), it's very easy to consume because they are based on a familiar JSON-based REST API. That means you can either access your services by rolling your own code or use one of existing SDKs that are available for most common platforms - Windows, iOS, Android and Python.

For example - if you're developing a Windows application, you'd use this NuGet package.

In fact, let's build a fresh Windows UWP app that uses Face API Cognitive Service...

1. Fire up Visual Studio (2017!) and start a new Windows Universal | Blank app project.

2. Go to NuGet Package Manager and update all existing packages.

3. Browse for and install 'Microsoft.ProjectOxford.Face' package.

4. Open MainForm.xaml and put this short piece of XAML UI inside the Page tag:

<Grid Background="{ThemeResource ApplicationPageBackgroundThemeBrush}">
    <Grid.RowDefinitions>
        <RowDefinition Height="Auto"/>
        <RowDefinition Height="Auto"/>
        <RowDefinition Height="*"/>
    </Grid.RowDefinitions>
    <TextBox x:Name="FaceApiKeyBox" Header="Face API Key" Grid.Row="0" />
    <StackPanel Orientation="Horizontal" Grid.Row="1">
        <Button Content="Browse" Click="OnBrowseForImage" />
    </StackPanel>
    <Viewbox Grid.Row="2">
        <Grid VerticalAlignment="Center">
            <Image x:Name="Image" Stretch="None" />
            <Grid x:Name="FacesGrid"/>
        </Grid>
    </Viewbox>

5. Add code for that single event handler. I'll break it down in smaller pieces...

5a. Pick a file. If file wasn't picked, do nothing.

private async void OnBrowseForImage(object sender, RoutedEventArgs e)
{
    var file = new FileOpenPicker();
    file.FileTypeFilter.Add(".jpg");
    file.FileTypeFilter.Add(".jpeg");
    file.FileTypeFilter.Add(".gif");
    file.FileTypeFilter.Add(".bmp");
    file.FileTypeFilter.Add(".png");
    file.SuggestedStartLocation = PickerLocationId.PicturesLibrary;
    file.ViewMode = PickerViewMode.Thumbnail;

    var fileName = await file.PickSingleFileAsync();
    if (fileName == null) return;
5b. Open selected file, put its contents into a visual control named Image and use the same file stream to call Face API. Not how FaceServiceClient is instantiated (providing key and endpoint). Providing endpoint may currently be optional, depending on which endpoint you've registered your service with.
Face[] detectedFaces;
using (var currentStream = await fileName.OpenStreamForReadAsync())
{
    var bitmap = new BitmapImage();
    await bitmap.SetSourceAsync(currentStream.AsRandomAccessStream());
    Image.Source = bitmap;
    currentStream.Seek(0, SeekOrigin.Begin);

    var client = new FaceServiceClient(FaceApiKeyBox.Text, "https://westeurope.api.cognitive.microsoft.com/face/v1.0");
    detectedFaces = await client.DetectAsync(currentStream);
}                                                                                

DetectAsync method will upload image data and ask the service to detect any faces it could find and return their data.

5c. Finally, we'll take that data and draw rectangle around detected faces.

FacesGrid.Children.Clear();
var red = new SolidColorBrush(Colors.Red);
var white = new SolidColorBrush(Colors.White);
var transparent = new SolidColorBrush(Colors.Transparent);

foreach (var face in detectedFaces)
{
    var rectangle = new Rectangle
    {
        Width = face.FaceRectangle.Width,
        Height = face.FaceRectangle.Height,
        StrokeThickness = 4,
        Stroke = red,
        Fill = transparent
    };

    var textBlock = new TextBlock {Foreground = white};

    var border = new Border
    {
        Padding = new Thickness(5),
        Background = red,
        BorderThickness = new Thickness(0),
        Visibility = Visibility.Collapsed,
        HorizontalAlignment = HorizontalAlignment.Left,
        Child = textBlock
    };

    var stackPanel = new StackPanel();
    stackPanel.Margin = new Thickness(face.FaceRectangle.Left, face.FaceRectangle.Top, 0, 0);
    stackPanel.HorizontalAlignment = HorizontalAlignment.Left;
    stackPanel.VerticalAlignment = VerticalAlignment.Top;
    stackPanel.Children.Add(rectangle);
    stackPanel.Children.Add(border);
    stackPanel.DataContext = face;

    FacesGrid.Children.Add(stackPanel);
}

6. Run the application.

7. Enter the Face API key that you've got from registering your Azure Face API service.

8. Browse for an image file.

9. Wait for the result.

I've used Microsoft's C#/Windows NuGet package to ease my way to using Cognitive Services Face API in my application. Remember there are more SDKs available for you to use on other platforms too! Including some links to their project pages - here's Android, iOS, and Python.

Full source code used for this blog post is available on github.

Microsoft Cognitive Services - Starting with Face API

I've started using Microsoft Cognitive Services a while back for the purpose of learning and using their features for my smart home scenarios. Now that they've moved to Azure, access to old services' home is coming to an end and old access keys are expiring. I couldn't find any way to properly migrate my old services data I've trained (like people's faces) to Azure, so I've decided to start from scratch, beginning with service creation. This blog post will deal with a new Cognitive Service creation, specifically adding a new Faces API service.

Microsoft Cognitive Services

Microsoft Cognitive Services is a set of APIs that employ powerful machine learning algorithms to provide application developers with intelligent features like image and voice recognition, face identification and language understanding. Starting under the code name Project Oxford and with limited availability for testing, Cognitive Services evolved significantly over the time and were recently moved to the Microsoft Azure Portal.

Faces API

Face API consists of two main group of APIs: face detection and face recognition. While face detection API can detect people faces in provided images, along with face's attributes (gender, age, emotion, makeup, ...) and position on that image (face, mouth, eyes, nose, ...), face recognition can actually recognize detected faces on an image, if detected face matches one of those in previously trained data.

Creating a new Face API service in Azure

Head to https://portal.azure.com and log into your account. Hit New (the big green plus) and search for Cognitive Services. You'll get a bunch of available apps in the results; select Face API.

In the above screen, enter required data and click Create. Before that, consider selecting the right pricing tier for you. In the time of this writing, there are two tiers available:

  • Free tier (F0) costs nothing, but is limited to 20 calls per minute and overall 30,000 calls per month,
  • Standard tier (S0) is limited to 10 calls per second and calls cost per the table below

There is also a cost for stored images, if you need face identification and matching capabilities.

Now that Face API resource is created, the most important thing is to take note of the pair of access keys that are available through the Resource Management -> Keys section. 


These keys are associated with your Azure account will allow you to access Face API endpoints. Let's try them live with API testing console!

Testing with API keys

Cognitive Services APIs have excellent documentation, with ready to test API console; you can even choose which Azure you want to use (note that not every service is available in every region)

Here's link to use West Central US endpoints: https://westcentralus.dev.cognitive.microsoft.com/docs/services/563879b61984550e40cbbe8d. Following it will land you on API documentation page with an entry form used to supply required and optional parameters. Note that API keys only work for the same region you picked when creating API service on Azure.


Query parameters lets you pick what you want the service to return. If any faces are detected, setting returnFaceId will get you IDs of that faces if you need them for subsequent calls. returnFaceLandmarks will, if set to true, return positions of various face landmarks, if they were detected. For returnFaceAttributes, simply list what attributes you want to be returned. In the above example, I'm interested in age and gender of any detected face.

Don't forget to enter or paste your API key into the Ocp-Apim-Subscription-Key field.

Finally, use request body to enter a valid image URL you want to test with and hit the Send button below.


If everything went OK, you should get a HTTP 200 response with a detailed JSON result (I've clipped some of the response below to shorten it):

[
  {
    "faceId": "***********************************",
    "faceRectangle": {
      "top": 79,
      "left": 57,
      "width": 43,
      "height": 43
    },
    "faceLandmarks": {
      "pupilLeft": {
        "x": 66.4,
        "y": 94.3
      },
      "pupilRight": {
        "x": 83.9,
        "y": 88.1
      },
      "noseTip": {
        "x": 79.4,
        "y": 102.0
      },
      "mouthLeft": {
        "x": 71.9,
        "y": 113.0
      },
      "mouthRight": {
        "x": 90.5,
        "y": 106.8
      },
      "eyebrowLeftOuter": {
        "x": 59.5,
        "y": 93.6
      },
      "eyebrowLeftInner": {
        "x": 70.2,
        "y": 90.1
      },
... ... ...
    "faceAttributes": {
      "gender": "male",
      "age": 64.8
    }
  },
  {
    "faceId": "***********************************",
"faceRectangle": { "top": 50, "left": 88, "width": 39, "height": 39 }, "faceLandmarks": { ... ... ... "noseRightAlarOutTip": { "x": 114.9, "y": 71.0 }, "upperLipTop": { "x": 110.3, "y": 77.4 }, "upperLipBottom": { "x": 110.7, "y": 78.2 }, "underLipTop": { "x": 112.3, "y": 81.7 }, "underLipBottom": { "x": 113.2, "y": 83.8 } }, "faceAttributes": { "gender": "female", "age": 60.0 } } ]

Wrap up

Now that Face API Cognitive Service is up and running, you can do interesting things with it. This blog post was about setting the service up, follow up posts will focus on on use cases and other Cognitive Services. 

Build 2016 – live stream here

Microsoft Build 2016 is starting in a few hours, You can watch the live stream below.

NTK 2015: Slides from my intro talk on IoT and “Smart Home”

First of all, I’d like to thank everybody who attended my introductory talk at this year’s NT Konferenca (celebrating 20th anniversary this year – and back to Portorož venue).

I’ve talked about my smart home wiring and how I’m able to manage it from inside and outside my home network using my Windows Phone and Surface 2 RT. How various sensors and switches are connected to the main bus and are communicating with the actuators that control the lights, outlets, valves, blinds, etc. How little & cheap devices can help us connect our home devices to the Internet.

SurfaceHome
[Very early version of my Windows app, running on Surface 2 RT provides me a dashboard to monitor AND control my home]

My talk also aimed to feature a very simplified version of the above app (with simulating sensors instead of reading actual values) running on the Raspberry Pi. Unfortunately, due to the lack of HDMI->VGA adapters, I couldn’t show actual UI from Pi’s video output, but the app worked flawlessly otherwise (with Visual Studio 2015 debugger attached to the app running on the Pi).

Problems aside, we were able to monitor faked sensor data that was sent by the Pi to the web app and then relayed, in real time - thanks to SignalR running on Microsoft Azure – to a simple UWP monitoring app running on a Windows 10 desktop.

I’ve also shown a UI-less version of that same app, running on the Pi in headless mode (a kind of Windows service-ish mode), which I hope proved that Raspberry Pi running Windows 10 makes one very very powerful combo. Even if Windows 10 IoT Core Is currently still way from being final and it’s going to improve on its way to the release.

Some more info in the following slides…

Going forward, I’m exploring the possibilities of the internet and cloud-stored data. Computing power that it can give you. Analysis. Learning. Reaction.

What I’m learning right now is finding the right balance between private and cheap.