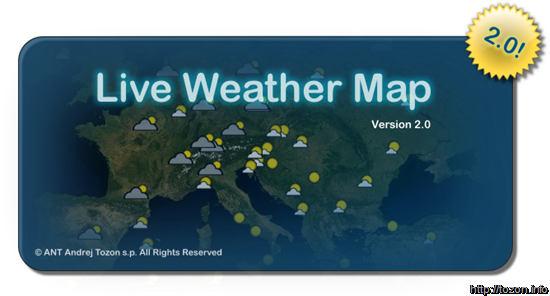
Did you know you can create cool looking splash screens for your WPF application right there with the Expression Designer?
Of course you did. Expression Designer provides you with all you need to create free-shaped, part-transparent, drop-shadowed graphics and I bet the the WPF splash screen support is going to be baked into the next release of Expression Blend as well.
This is a quick walk through designing a splash screen with the Expression Designer.
1. With Expression Designer open, create a new rectangle and set its Corner Radius property to about 30px (depending your rectangle’s size).
2. Set rectangle’s color to match your application theme and make it a bit transparent by setting Opacity to around 70%.

3. Find the Effects property section and click the Add Effect button. Choose Effects | Drop Shadow.

4. Decrease Softness and Offset and increase Opacity properties to make the shadow more compact. You will end up with something like this:

5. Create a new layer and put a new rectangle on it. Make it the same size as the first one and put it on the same spot to make them both aligned exactly.
6. Set its stroke to None and fill it with a transparent gradient: First Stop Alpha: 80%, Second Stop Alpha: 0%.
7. Move gradient’s origin more to the side and make it larger.

Your rectangle should now look just a little bit more exciting:

8. Time for some text… With the Text tool, create your application title. I’ve chosen 36 pt Arial Rounded MT Bold font with white color fill. Applying some transparency to the text will make it absorb some background color for a more glassy look. You could add some Outer Glow Effect to make it even cooler.
9. Add all other text you want to show in your splash screen. Here’s what I got so far:

10. If you have any graphics that could communicate to the user what your application is all about, you could use that as well. It might also be a screenshot from the actual application if you can’t find anything better. I used a screenshot of my sample Live Europe Weather Map application. Adding a bitmap to the existing Expression Design project is really easy – just select File | Import… and open your graphics - it will get added to the current layer so you will probably want to create a new layer before doing that. And don’t forget to set some transparency to that as well:

11. Almost done. To break out of dull symmetric rectangly shape, you can mix in some additional decorations, like I did to point out that this is a whole new version of the application [the yellow badge is from the bittbox badges collection:

And this is the final result for now. We’ve got transparency, irregular shape, drop shadow… Of course, this works for a sample, but for a real-world application I would have to put some additional work into it; pay more attention to the details, colors, gradients, etc.
12. When satisfied with your work, just select all objects, select File | Export… and choose PNG as your target format. After the file is saved on your disk, all you need is incorporate it in your WPF application.
Expression Design offers a lot more effects and options that were shown in this quick walkthrough. I am particularly happy to see how easy it is to play with different effects, mixing and layering them in different combination. There is, of course, also export to different Xaml instances, which makes it even more sweet.
While writing this post, I noticed that the WPF team published a new WPF Splash Screen Item Templates for Visual Studio 2008 SP1. This gives you additional option to add a splash screen to your WPF application – a new (Splash Screen (WPF)) item will be available in your templates window when adding a new item. Selecting that will insert a default graphics to your project and set it as the splash screen. You’ll have to customize the graphics yourself though. This is a nice option, although I’d like to see some form of a wizard with some styling options, font/title selections, etc… In the next version of Visual Studio perhaps…
1a5e12bc-a75a-4744-b17b-3ccb6b6cf7f4|0|.0|27604f05-86ad-47ef-9e05-950bb762570c