With Halloween around the corner, it’s time for some scary photos… In this post I’ll explain how I built my demo application I showed at my Windows 7 Launch talk.
Expression Blend 3 shipped with a few interesting samples, available for immediate use. One of them is called Wall3D (Silverlight 3) and is a great example of one of the new Silverlight 3D features, called perspective transform.

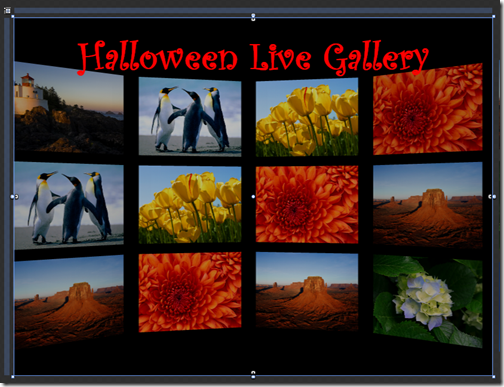
This sample (perhaps a starter kit is a better description for it) features a 3D photo gallery, which sort of puts the viewer in the center of an oval “room”, full of photos, with an option to rotate the view to the left or right (flick / mouse click and pan), zoom in or out (mouse wheel), etc.. The kind of what people used to do in Flash; now it’s possible in Silverlight too. The sample serves also as a demonstration of yet another new Blend 3 feature, called Sample data – the photos on the above image were generated through this feature. Let’s explore the sample and see how we can push it further, shall we?
After opening Blend 3, switch to the Samples page and choose Wall3D (Silverlight 3) and the default project will be generated for you. 
You can test the application by hitting F5. You navigate through the gallery by flicking the view left or right and zoom in or out with your middle mouse button.
Examining the code that’s been created in the project will reveal the following:
- the photos come from the sample data source (XML + photos, which are also included in the project – look into the SampleData folder)
- “The wall” is driven by the CircularPanel3D control (a custom panel)
Knowing this, we’re ready to create our own 3D gallery. We’ll only need a single thing from this sample project, and that’s the CircularPanel3D.cs file, found in the root of the project. Copy and save that in some other folder for later reference, then start a new Silverlight 3 Application project in Blend.
I used an ItemsControl instead of ListBox to arrange and display the photos. Of course both will accept CircularPanel3D as their ItemsPanel, I just didn’t need item selection in this case. Here’s how it all looked in Blend designer:
Now what’s wrong with this picture? It’s hard to design something when you’ve got no visual feedback to help you with the layout and arrangements. I have already modified the ItemTemplate, but without the actual photos, it’s hard to do proper design work. And that’s where the sample data comes in. To create a sample data source, open the Data panel and click on the second icon from the right  (Add sample data source). Choose Define New Sample Data, name the data source and click OK. You can shape the sample data source however you like – flat, hierarchical, with entities having simple or complex type properties, etc. For this gallery, I created the following source:

Bind this data source to the ItemsControl as its items source – voila!
Cool, much better. Modifying the ItemTemplate has just become a lot easier. Let’s add another element for displaying a bit more details about the photo (like the title and location where it was taken).


So we’ve got two views for the ItemTemplate, each view being represented with a separate element – one’s with the photo and the second one with details. We have to provide a way for user to switch between the two; how would we do this? Write code? Call the developer? Not necessarily. If we’re in luck, the appropriate piece of code may have already been written, waiting to be taken it used in Blend for declaratively specifying whatever we wanted to do to those elements and how. That piece of code is called a behavior. There are several places on the web to look for behaviors (as well as more info on what they are and how to produce them), but my first bets would be the Expression Gallery and Expression Blend Samples library on Codeplex; the letter containing some very handy behaviors.
I added a couple of behaviors to add interaction to gallery elements - FlipAction would switch the photo and details part through flip motion, triggered by DoubleClick trigger; and ScaleBehavior would enlarge the photo on mouse over. A couple of clicks for very cool-looking effect.
Let’s take a look at the data source... I decided to use Flickr to retrieve the photos, because it’s API is easy to use and can (amongst other things) return geo-location of the place where photo was taken (when available). This geo-location is then passed to the Bing Maps geocoding web serviceas an input parameter to retrieve the real-world address; these addresses can be seen on the bottom of the flipped photo.

Playing with geo-location was fun so I decided to take it a step further. I put together a special ShowMapAction, which is currently triggered by a mouse wheel over the photo (or details). The action simply shows the location on the interactive Bing Map (I used Bing Maps Silverlight Map Control for this).

Just a word of caution: Geo-encoded photos are cool, but be careful what you’re publishing on the net. The information may not always be used for good purposes.
The final result can be seen here (live). Right in time for keeping track with what’s going on on Halloween.
Finally I have to say I’m spending a lot more time in Blend since version 3 got out. It’s evolving into a great tool and behaviors are going to take a significant part in designer’s/integrator’s role in the future.
http://tozon.info/gallery/
6f741090-5d2f-4b8a-bc75-39a81fc68691|5|4.2|27604f05-86ad-47ef-9e05-950bb762570c