Andrej Tozon's blog

In the Attic

NAVIGATION - SEARCH

NTK 2015: Slides from my intro talk on IoT and “Smart Home”

First of all, I’d like to thank everybody who attended my introductory talk at this year’s NT Konferenca (celebrating 20th anniversary this year – and back to Portorož venue).

I’ve talked about my smart home wiring and how I’m able to manage it from inside and outside my home network using my Windows Phone and Surface 2 RT. How various sensors and switches are connected to the main bus and are communicating with the actuators that control the lights, outlets, valves, blinds, etc. How little & cheap devices can help us connect our home devices to the Internet.

SurfaceHome
[Very early version of my Windows app, running on Surface 2 RT provides me a dashboard to monitor AND control my home]

My talk also aimed to feature a very simplified version of the above app (with simulating sensors instead of reading actual values) running on the Raspberry Pi. Unfortunately, due to the lack of HDMI->VGA adapters, I couldn’t show actual UI from Pi’s video output, but the app worked flawlessly otherwise (with Visual Studio 2015 debugger attached to the app running on the Pi).

Problems aside, we were able to monitor faked sensor data that was sent by the Pi to the web app and then relayed, in real time - thanks to SignalR running on Microsoft Azure – to a simple UWP monitoring app running on a Windows 10 desktop.

I’ve also shown a UI-less version of that same app, running on the Pi in headless mode (a kind of Windows service-ish mode), which I hope proved that Raspberry Pi running Windows 10 makes one very very powerful combo. Even if Windows 10 IoT Core Is currently still way from being final and it’s going to improve on its way to the release.

Some more info in the following slides…

Going forward, I’m exploring the possibilities of the internet and cloud-stored data. Computing power that it can give you. Analysis. Learning. Reaction.

What I’m learning right now is finding the right balance between private and cheap.

Windows Phone 8.1 – LocalCacheFolder

In one of my talks at recent NT konferenca I talked about some of the new ways of working with application data in Windows Phone 8.1. With all the exciting additions to the latest Windows Phone 8.1 APIs, the best news around application data in those new APIs is that they are now (mostly) aligned with the Windows Runtime (WinRT), so Windows 8 developers can pick up on them immediately and transition their work to the new platform, share code, etc.

With the aligned data APIs, Windows Phone 8.1 applications (both Silverlight and Runtime) can now store their data into one of the following folders:

  1. LocalFolder – a local folder, used for storing application data, it’s persistent across application updates and gets backed up to the cloud. This folder was already available in Windows Phone 8 and it’s the same folder as Isolated Storage known from Windows Phone 7.
  2. TemporaryFolder – also a local folder, but its space is managed by the OS. Whenever the system detects it’s running low on storage space, it will start deleting files in temporary so don’t ever strongly depend on files stored in this folder. It makes a perfect place for storing cached web responses or images that can be recreated any time. This folder does not participate in backups.
  3. RoamingFolder – files, stored in this folder, will roam across devices, meaning those files will be synchronized over the cloud whenever possible. Perfect for settings and/or small chunks of state (i.e. for continuous clients). When roaming is disabled on the device, those files (and settings) will get backed up as well. The storage space is limited to 100kB – if application goes over that quota, the synchronization stops (until the total usage falls back under roaming storage quota).

LocalCacheFolder

But wait - there’s one more folder in Windows Phone 8.1, that’s available in Windows Phone 8.1 API only. Even more, unlike some other APIs that are present on both Windows and Windows Phone and will throw an exception when used from the wrong platform, this one is completely hidden from Windows. Using it from a shared project, you have to #ifdef it out of Windows platform and include in Windows Phone build only:

#if WINDOWS_PHONE_APP
    var localCache = ApplicationData.Current.LocalCacheFolder;
#endif

So what is it? Is it used for caching? Well, not exactly (though it might, but I prefer the TemporaryFolder for that).

The LocalCacheFolder is almost exactly like the good old LocalFolder, with one single, but important exception – unlike LocalFoder, the files written to this folder will never be backed up to the cloud and will always stay on the device it was originally written at. Good for storing some (semi) sensitive information or pieces of state you don’t want or need to restore later.

And while I mentioned sensitive data, there’s one more thing worth mentioning - the best place to store sensitive data is into the Credential Locker (represented by the PasswordVault class), a familiar class from WinRT APIs, that is now also available to Windows Phone 8.1 – YAY!

Summary

To finish up, here’s a quick recap – use PasswordVault for storing sensitive information, LocalCacheFolder for data you don’t want ever to leave that particular phone, TemporaryFolder for temporary, easy-to-recreate data, RoamingFolder for settings and small state to synchronize across devices, and LocalFolder for main application data that gets backed up to the cloud (and, of course – restored).

Windows 8.1 XAML: Render to Bitmap

One of my favorite features coming in Windows 8.1 for developers has got to be the ability to render a selected piece of UI to an image and allowing for further manipulation with that image (changing pixels and ultimately saving it to some permanent storage location). We have this in WPF, Silverlight and Windows Phone. And now it’s coming to Windows Store apps as well. Specifically, it’s the RenderTargetBitmap class that makes this possible.

Take for example, this piece of UI:

image

Let’s say I don’t want to send this user data in a text form, but rather send an image of the filled-out form, for a change. And I want to include the violet part only, to get just the form, pure. You know, get rid of the gradient...

So I would take the Grid element that’s topmost in XAML tree I want to capture, and name it “TheForm”.
On button click, I’d let the user pick a file location, then invoke three magical lines:

var renderTargetBitmap = new RenderTargetBitmap();
await renderTargetBitmap.RenderAsync(TheForm);
var pixelBuffer = await renderTargetBitmap.GetPixelsAsync();

Where in fact the second line is the one actually doing the hard work of capturing the snapshot… So simple!

The rest of the code I have is just about picking the right encoder and actually pushing the bytes to the file:

using (var stream = await file.OpenAsync(FileAccessMode.ReadWrite))
{
    var encoder = await BitmapEncoder.CreateAsync(BitmapEncoder.JpegEncoderId, stream);
    encoder.SetPixelData(
        BitmapPixelFormat.Bgra8,
        BitmapAlphaMode.Ignore,
        (uint)renderTargetBitmap.PixelWidth,
        (uint)renderTargetBitmap.PixelHeight,
        logicalDpi,
        logicalDpi,
        pixelBuffer.ToArray());

    await encoder.FlushAsync();
}

But wait, there’s more!

The RenderTargetBitmap class is actually a subclass of ImageSource, which means you can set it to any property accepting the same type without having to worry about encoders or moving bytes around.

In the following example, I’m going to create a fake form entry sniffer that would take a snapshot of the form once on every two user keystrokes.
Instead of secretly sending snapped image to a secret location through a secret channel, I’ll simply add an Image control next to TheForm and make it a little bigger, say twice the width of the original form. I named it MirorImage.

In Page’s constructor, I’ll initialize a new instance of RenderTargetBitmap and set it as MirrorImage’s source:

mirrorRenderTargetBitmap = new RenderTargetBitmap();
MirrorImage.Source = mirrorRenderTargetBitmap;

With that done, I only have to worry about picking the right time to capture the form. I said I’d capture once every two keystrokes, so:

private async void TextBox_TextChanged(object sender, TextChangedEventArgs e)
{
    if (mustRender)
    {
        await mirrorRenderTargetBitmap.RenderAsync(TheForm);
    }
    mustRender = !mustRender;
}

(every TextBox on TheForm is of course wired to the TextBox_TextChanged event handler)

And the result:

image

The form on the right is just a rendered image of the original “TheForm” from the left. And although I’ve set the Image’s width to be twice the one of “TheForm” (while not specifically setting the height), the image is rendered correctly and proportionally. Note that you can also set the target image size manually when invoking the RenderAsync method – its overload is accepting width and height parameters.

These are only a couple of very basic examples of RenderTargetBItmap class usages, there are numerous cases where this is going to come in handy, I’m sure. This feature will be included in forthcoming Windows 8.1 update and will not work on current Windows 8 version.

Here’s a downloadable source code for this example. You’ll Visual Studio 2013 (Preview) and Windows 8.1 to open and run the project.

re//rebuild/ Slovenia, 11.12.2012: Windows Phone 8

I’ve just posted slides from today’s re//build Slovenia event, where I talked about Windows Phone 8. Download the source code from here.

Voice speech/recognition demos were the fun part and they actually worked better than I had expected. What surprised me is a lot of people still haven’t heard of (or used) the MVVM pattern, which, in one form or another, can help you a XAML world of development a lot. And lately it’s getting quite popular on the HTML side as well.

Let’s change that.

Share charm stopped working while debugging Windows Store app?

An important part of working on Windows Store apps is implementing a Share contract, which allows your app to share parts of its content with other installed apps. Those apps then act as an extension to your app, taking that content and implementing them in different ways, e.g. the Mail app will include it in the body of a new mail or an attachment, twitter and Facebook clients will post it on your timeline, etc.

Debugging your Search contract code can, however, result in system-wide shutdown of the service, meaning that no Windows Store app can share any content with other apps anymore. In such case, instead of getting a list of apps, that are available to share, you’ll be notified that:

Something went wrong with Share. Try again later.

Typically, this happens when you stop debugging (in Visual Studio) while in DataTransferManager’s DataRequested event handler. And this can happen a lot, if you’re not careful Smile

OK, here’s what you do if it does happen. [tl;dr; Restart Explorer]

1. Open Task Manager
2. Select the Details tab
3. Find Explorer.exe (easiest to sort by Name)
4. End Task (button in right lower corner will do the job).
- don’t be afraid when your taskbar disappears, you’ll get it back
5. Select File –> Run new task
6. Type Explorer.exe in the input box
7. Press OK (and taskbar is back)

Your Share charm should be working again.

Highlighting search results within Windows Store apps

Download source code

Guidelines and checklist for search page for Windows Store apps (formerly Metro) suggest using hit highlighting to “indicate why a search result matches the [search] query”, as displayed on this screenshot (taken from the linked page):

That’s a great way to show the user why results are returned from the search query, but how do you implement that?

I already hinted at the suggested approach in my previous post, where I wrote about bindable Runs. Using the same technique, the hit highlighting guideline can be implemented pretty easily.

Let’s see how.

I’ve started out with a default Windows Store Grid app template, which provides the conveniently built-in sample data source. That’s the source we’re going to search through.

image

Of course we’ll need to implement the Search contract: Project –> Add New Item –> Search Contract. That will add the search results page to the project and put search activation code snippet into the App class.

image

The details for searching through the sample data source is yours to implement(a sample is included in provided source code).

Now for the relevant part.

The trick is to create a binding service that would take 3 input parameters:

1. Full text that contains the highlighted part,
2. Search text,
3. (Optional) highlight brush.

The service would extend the TextBlock control by clearing all its inlines and replacing them with a new set of Runs that will compose the new, highlighted text.

I’ve created a service that exposes these three parameters as dependency properties, this is the relevant code that executes when either full or highlighted text changes (find full implementation in the provided source code):

private static void OnTextChangedCallback(DependencyObject d, DependencyPropertyChangedEventArgs e)
{
    TextBlock textBlock = d as TextBlock;
    if (textBlock == null)
    {
        return;
    }
    string fullText = GetFullText(textBlock);
    string highlightedText = GetHighlightedText(textBlock);

    if (string.IsNullOrEmpty(fullText) || highlightedText == null)
    {
        return;
    }

    Brush brush = GetHighlightBrush(textBlock) ?? new SolidColorBrush(Windows.UI.Colors.Red);

    highlightedText = highlightedText.Substring(1, highlightedText.Length - 2);

    int length = highlightedText.Length;
    int lastIndex = 0;
    int index = fullText.IndexOf(highlightedText, 0, StringComparison.CurrentCultureIgnoreCase);

    textBlock.Inlines.Clear();
    while (index >= 0)
    {
        textBlock.Inlines.Add(new Run { Text = fullText.Substring(lastIndex, index - lastIndex) });
        textBlock.Inlines.Add(new Run { Text = fullText.Substring(index, length), Foreground = brush });
        lastIndex = index + length;
        index = fullText.IndexOf(highlightedText, lastIndex, StringComparison.CurrentCultureIgnoreCase);
    }
    textBlock.Inlines.Add(new Run { Text = fullText.Substring(lastIndex) });
}

To use this binding service, open StandardStyles.xaml (found in the Common folder) and search for the StandardSmallIcon300x70ItemTemplate style. This style is used to display the items in the search results page. You’ll find three TextBlocks in there – one for Title, one for Subtitle and the last one displays the Description. Instead of binding to Text property, wire those TextBlocks to the new binding service:

<TextBlock ifs:BindingService.FullText="{Binding Title}" ifs:BindingService.HighlightedText="{Binding DataContext.QueryText, ElementName=resultsPanel}" ifs:BindingService.HighlightBrush="#d9001f" Style="{StaticResource BodyTextStyle}" TextWrapping="NoWrap"/>
<TextBlock ifs:BindingService.FullText="{Binding Subtitle}" ifs:BindingService.HighlightedText="{Binding DataContext.QueryText, ElementName=resultsPanel}" ifs:BindingService.HighlightBrush="#d9001f"  Style="{StaticResource BodyTextStyle}" Foreground="{StaticResource ApplicationSecondaryForegroundThemeBrush}" TextWrapping="NoWrap"/>
<TextBlock ifs:BindingService.FullText="{Binding Description}" ifs:BindingService.HighlightedText="{Binding DataContext.QueryText, ElementName=resultsPanel}" ifs:BindingService.HighlightBrush="#d9001f"  Style="{StaticResource BodyTextStyle}" Foreground="{StaticResource ApplicationSecondaryForegroundThemeBrush}" TextWrapping="NoWrap"/>

And you’re done Smile

image

Download source code

Windows Store apps: the case of missing StringFormat or Binding on the Run

If your previous developer experience include developing for other XAML technologies and you’re moving into the Windows Store apps space, you’ve already noticed that a lot of things you were used to in other techs, are missing from your Windows Store app development experience. One example being there’s no more StringFormat property available in your Binding markup construct. You may have been used to writing something like:

<TextBlock Text="{Binding Name, StringFormat='Name: \{0\}'}" />

(that would bind your TextBlock to the Name property, outputting “Name: [property value]” to the UI)

With StringFormat missing from WinRT’s XAML Binding, you have two options:

1. Create a StringFormat value converter and handle your string formatting there.

2. Break down your text into smaller chunks of text and bind those to the Runs, which are part of your TextBlock:

<TextBlock Style="{StaticResource BodyTextStyle}" TextWrapping="NoWrap">
  <Run Text="Name: " />
  <Run Text="{Binding Name}" Foreground="Red" />
</TextBlock>

Yes, Runs are bindable!

Not only will Runs inherit styling attributes from their parent TextBlock, you can override them in whole, or just parts of it (like changing color only, etc.) And you make your TextBlock “bind” to more than one property in one go, something not possible with StringFormat or converter workaround.

Pretty cool.

Variable-sized grid items in Windows 8 apps

This is a screenshot of the Windows 8 Store app:

image

And this is what you get when you start a new Windows 8 “Windows Store Grid App”:
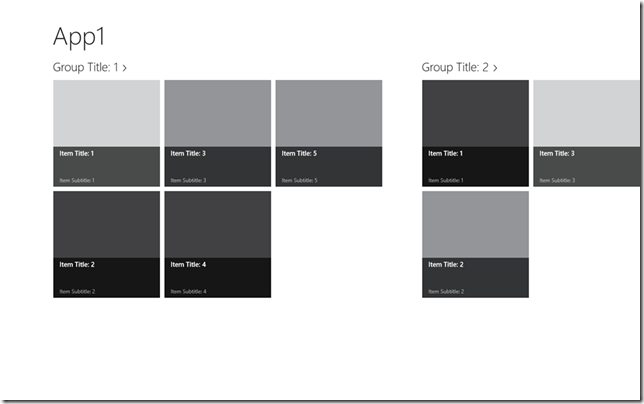
image_3

Wouldn’t it be great if you would be able to control the size of each particular item in your grid? To break out from dullness of having all items the same size, like, for example, to emphasize featured items; or for just any other reason?

Turns out you can do that (quite easily). I came about to this blog post describing one way to do it: “Windows 8 Beauty Tip: Using a VariableSizedWrapGrid in a GridView makes Grids Prettier” by Jerry Nixon. Reading it, I thought there had to be some easier way to do it than subclassing a GridView just for this.

And it turned out there was. Or at least it would be, if Windows 8 XAML supported Style Bindings like Silverlight 5. Not having that, the solution required that extra step that would allow binding to properties from within declared styles.

So what’s the idea?

Looking at GridView’s GroupStyle ItemsPanelTemplate after creating a new, default, Windows Store Grid App, it’s already set to VariableSizedWrapGrid – exactly what I needed. Now you just have to set its ItemWidth and ItemHeight properties to 250, and at the same time, remove those explicit sizes from the Standard250x250ItemTemplate (found in StandardStyles.Xaml). This puts GridView in control of sizing the GridViewItems.

The next step is adapting the model with extra two properties that will hold the horizontal and vertical spanning values. For this, you have to extend the provided SampleDataItem class with two new properties:

private int _horizontalSize = 1;
public int HorizontalSize
{
    get { return this._horizontalSize; }
    set { this.SetProperty(ref this._horizontalSize, value); }
}

private int _verticalSize = 1;
public int VerticalSize
{
    get { return this._verticalSize; }
    set { this.SetProperty(ref this._verticalSize, value); }
}

The default value for both is 1, which means, each item should occupy one unit of the grid only. HorizontalSize of 2 should span 2 columns, and VerticalSize of 2 should span 2 rows. Having both properties set to 2 would of course make the item occupy four units of the grid (2x2).

For this example, I only made the first item bigger.

If Windows 8 apps supported Binding from styles, I would easily finish this off by creating a new Style like:

<Style x:Key="VariableGridViewItemStyle" TargetType="GridViewItem">
  <Setter Property="VariableSizedWrapGrid.ColumnSpan" Value="{Binding HorizontalSize}" />
  <Setter Property="VariableSizedWrapGrid.RowSpan" Value="{Binding VerticalSize}" />
</Style>

… and set this style as GridView’s ItemContainerStyle.

Unfortunately, such binding is not yet supported, so I had to find some other way to do it.

Delay’s code to the rescue! It’s a complete (and short) solution that does exactly what I needed and it just works. I had to adapt it to suit WinRT and its new reflection model a bit, but at its core it stayed the same.

Here’s the adapted style that can bind to my properties through modified Delay’s helper:

<Style x:Key="VariableGridViewItemStyle" TargetType="GridViewItem">
    <Setter Property="local:SetterValueBindingHelper.PropertyBinding">
        <Setter.Value>
            <local:SetterValueBindingHelper>
                <local:SetterValueBindingHelper
                    Type="VariableSizedWrapGrid"
                    Property="ColumnSpan"
                    Binding="{Binding HorizontalSize}" />
                <local:SetterValueBindingHelper
                    Type="VariableSizedWrapGrid"
                    Property="RowSpan"
                    Binding="{Binding VerticalSize}" />
            </local:SetterValueBindingHelper>
        </Setter.Value>
    </Setter>
</Style>

After applying this change, the result can effectively be observed in Visual Studio 2012 (thanks XAML Editor Smile), and here’s how the app looks when running:
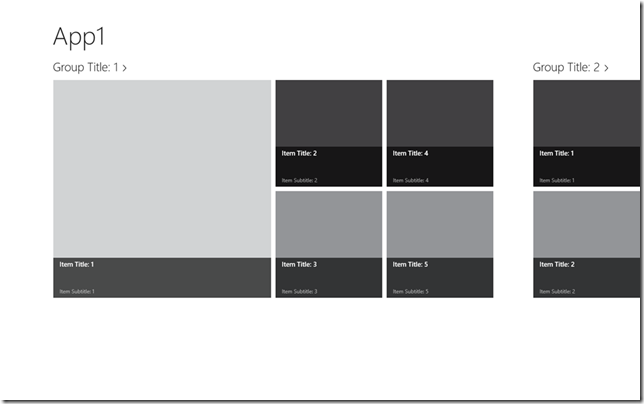
image_4

I like this approach because it’s XAML-only - it doesn’t force me to use a derived control and I can specify the sizing properties I want to bind to through my style resource. Which makes the solution a bit more flexible. The downside is of course this requirement of having a Style binding helper class, but I really really hope the Windows 8 gets this built in ASAP.

To close, here’s the modified version of Delay’s SetterValueBindingHelper (not really tested yet!):

public class SetterValueBindingHelper
{
    /// <summary>
    /// Optional type parameter used to specify the type of an attached
    /// DependencyProperty as an assembly-qualified name, full name, or
    /// short name.
    /// </summary>
    [SuppressMessage("Microsoft.Naming", "CA1721:PropertyNamesShouldNotMatchGetMethods",
        Justification = "Unambiguous in XAML.")]
    public string Type { get; set; }

    /// <summary>
    /// Property name for the normal/attached DependencyProperty on which
    /// to set the Binding.
    /// </summary>
    public string Property { get; set; }

    /// <summary>
    /// Binding to set on the specified property.
    /// </summary>
    public Binding Binding { get; set; }

    /// <summary>
    /// Collection of SetterValueBindingHelper instances to apply to the
    /// target element.
    /// </summary>
    /// <remarks>
    /// Used when multiple Bindings need to be applied to the same element.
    /// </remarks>
    public Collection<SetterValueBindingHelper> Values
    {
        get
        {
            // Defer creating collection until needed
            if (null == _values)
            {
                _values = new Collection<SetterValueBindingHelper>();
            }
            return _values;
        }
    }

    private Collection<SetterValueBindingHelper> _values;

    /// <summary>
    /// Gets the value of the PropertyBinding attached DependencyProperty.
    /// </summary>
    /// <param name="element">Element for which to get the property.</param>
    /// <returns>Value of PropertyBinding attached DependencyProperty.</returns>
    [SuppressMessage("Microsoft.Design", "CA1011:ConsiderPassingBaseTypesAsParameters",
        Justification = "SetBinding is only available on FrameworkElement.")]
    public static SetterValueBindingHelper GetPropertyBinding(FrameworkElement element)
    {
        if (null == element)
        {
            throw new ArgumentNullException("element");
        }
        return (SetterValueBindingHelper) element.GetValue(PropertyBindingProperty);
    }

    /// <summary>
    /// Sets the value of the PropertyBinding attached DependencyProperty.
    /// </summary>
    /// <param name="element">Element on which to set the property.</param>
    /// <param name="value">Value forPropertyBinding attached DependencyProperty.</param>
    [SuppressMessage("Microsoft.Design", "CA1011:ConsiderPassingBaseTypesAsParameters",
        Justification = "SetBinding is only available on FrameworkElement.")]
    public static void SetPropertyBinding(FrameworkElement element, SetterValueBindingHelper value)
    {
        if (null == element)
        {
            throw new ArgumentNullException("element");
        }
        element.SetValue(PropertyBindingProperty, value);
    }

    /// <summary>
    /// PropertyBinding attached DependencyProperty.
    /// </summary>
    public static readonly DependencyProperty PropertyBindingProperty =
        DependencyProperty.RegisterAttached(
            "PropertyBinding",
            typeof (SetterValueBindingHelper),
            typeof (SetterValueBindingHelper),
            new PropertyMetadata(null, OnPropertyBindingPropertyChanged));

    /// <summary>
    /// Change handler for the PropertyBinding attached DependencyProperty.
    /// </summary>
    /// <param name="d">Object on which the property was changed.</param>
    /// <param name="e">Property change arguments.</param>
    private static void OnPropertyBindingPropertyChanged(DependencyObject d, DependencyPropertyChangedEventArgs e)
    {
        // Get/validate parameters
        var element = (FrameworkElement) d;
        var item = (SetterValueBindingHelper) (e.NewValue);

        if ((null == item.Values) || (0 == item.Values.Count))
        {
            // No children; apply the relevant binding
            ApplyBinding(element, item);
        }
        else
        {
            // Apply the bindings of each child
            foreach (var child in item.Values)
            {
                if ((null != item.Property) || (null != item.Binding))
                {
                    throw new ArgumentException(
                        "A SetterValueBindingHelper with Values may not have its Property or Binding set.");
                }
                if (0 != child.Values.Count)
                {
                    throw new ArgumentException(
                        "Values of a SetterValueBindingHelper may not have Values themselves.");
                }
                ApplyBinding(element, child);
            }
        }
    }

    /// <summary>
    /// Applies the Binding represented by the SetterValueBindingHelper.
    /// </summary>
    /// <param name="element">Element to apply the Binding to.</param>
    /// <param name="item">SetterValueBindingHelper representing the Binding.</param>
    private static void ApplyBinding(FrameworkElement element, SetterValueBindingHelper item)
    {
        if ((null == item.Property) || (null == item.Binding))
        {
            throw new ArgumentException(
                "SetterValueBindingHelper's Property and Binding must both be set to non-null values.");
        }

        // Get the type on which to set the Binding
        Type type = null;
        TypeInfo typeInfo = null;
        if (null == item.Type)
        {
            // No type specified; setting for the specified element
            type = element.GetType();
            typeInfo = type.GetTypeInfo();
        }
        else
        {
            // Try to get the type from the type system
            type = System.Type.GetType(item.Type);
            if (null == type)
            {
                // Search for the type in the list of assemblies
                foreach (var assembly in AssembliesToSearch)
                {
                    // Match on short or full name
                    typeInfo = assembly.DefinedTypes
                        .Where(t => (t.FullName == item.Type) || (t.Name == item.Type))
                        .FirstOrDefault();
                    if (null != typeInfo)
                    {
                        // Found; done searching
                        break;
                    }
                }
                if (null == typeInfo)
                {
                    // Unable to find the requested type anywhere
                    throw new ArgumentException(string.Format(CultureInfo.CurrentCulture,
                                                              "Unable to access type \"{0}\". Try using an assembly qualified type name.",
                                                              item.Type));
                }
            }
            else
            {
                typeInfo = type.GetTypeInfo();
            }
        }
        
        // Get the DependencyProperty for which to set the Binding
        DependencyProperty property = null;
        var field = typeInfo.GetDeclaredProperty(item.Property + "Property"); // type.GetRuntimeField(item.Property + "Property");
        if (null != field)
        {
            property = field.GetValue(null) as DependencyProperty;
        }
        if (null == property)
        {
            // Unable to find the requsted property
            throw new ArgumentException(string.Format(CultureInfo.CurrentCulture,
                                                      "Unable to access DependencyProperty \"{0}\" on type \"{1}\".",
                                                      item.Property, type.Name));
        }

        // Set the specified Binding on the specified property
        element.SetBinding(property, item.Binding);
    }

    /// <summary>
    /// Returns a stream of assemblies to search for the provided type name.
    /// </summary>
    private static IEnumerable<Assembly> AssembliesToSearch
    {
        get
        {
            // Start with the System.Windows assembly (home of all core controls)
            yield return typeof(Control).GetTypeInfo().Assembly;
        }
    }
}

Announcing a new user group

Dear Slovenian developers and UI enthusiasts, mark your calendars for 8th of November 2011 as that’s the day we’re launching a new user group targeting the UI/UX professionals.

SIUX LogoSIUX – Slovenian UX User Group – a sister user group (or a Siamese twin group as we fondly call it Smile) of now years-running SLODUG, Slovenian Developers User Group (SLODUG), where we’ll focus on technologies and areas like WPF, Silverlight, HTML5, Kinect, Windows Phone, Windows 8; talk through their visual and interaction design aspects; explore user interface examples, usability and related factors.

SLODUG and SIUX will share their members and meeting place. As mentioned, the first, inaugural meeting, will take place on Tuesday, 8th of November 2011, starting at 17h. Two talks are scheduled for the meeting: Developing for XBox Kinect by Sašo Zagoranski and Metro: the UI of the future?  by me. The meeting will take place in Microsoft Lecture room at Šmartinska 140.

Full agenda:

17:00: Intro & announcements
17:15 – 18:00: Developing for XBox Kinect, Sašo Zagoranski / Semantika d.o.o.
18:15 – 19:00: Metro: UI of the future?, Andrej Tozon / ANT Andrej Tozon s.p.
19:00: Discussion over pizza &  beer

We’re also looking for speakers – if you’re interested or  know anybody from the field, please contact me and we’re schedule your talk in one of our next meetings.

Hope to see you!

Until then, you can follow us on Twitter or join our Facebook group.


Windows 8 Metro declarations: User Tile Provider

This blog post is part of my Windows 8 metro-style application declarations series. Read more about declarations in the introductory post about application manifest.

User Tile Provider declaration allows you to register your application as a user tile provider. That means that user will be able to use your application to change her user tile.

One of many ways of changing the user tile can is by clicking your personal tile (avatar) on Windows 8 Start screen – four options are currently displayed, one of them is “Change user tile”:

image

Selecting the first option will take you to Control Panel’s Personalize page, set on User Tile:

image

2 options for changing the tile already available: the user can browse through her pictures and select the one that she likes or she can take a new one with the help of her web cam.

Your own application as a user tile provider

As with other declarations, you declare your application as a user tile provider in the application manifest. The easiest way to do that is through the manifest editor. You’ll see that when you add the User Tile Provider declaration to the Supported Declarations list, there are no declaration specific options to be set.

image

That’s good. After setting the declaration, run or just deploy your application and return to the Control Panel. You should now be looking at something like this:

image

Your application is now registered as the official user tile provider and by clicking on the application tile it will be launched.

And fail.

Of course, there is some wiring you have to do in your code to make this work properly.

Wiring the application logic

There isn’t a special kind of activation reserved for this type of activation, it’s activated through the special Protocol activation - I covered Protocol activation before – if you set up Protocol activation as described in that blog post, you can check for specific protocol in the OnProtocolActivated handler; you’ll see that Uri, passed in through provided arguments, looks something like UserTileProvider://, so you just have to check for a particular protocol to see how or why your application was invoked:

private void OnProtocolActivated(ProtocolActivatedEventArgs args)
{
    if (args.Uri.Scheme == "usertileprovider")
    {
        PhotoView page = new PhotoView();
        page.SetProfileImage();
        Window.Current.Content = page;
        Window.Current.Activate();
        return;
    }

    // ... other protocol handlers
}

Here I’m bringing up a new PhotoView page (also discussed in my previous blog post) whenever my application is invoked for choosing a user tile.

Changing the user tile

OK, so application now responds to the user tile change call. But how do we actually change the tile? Well, there’s an API for that. You can get and set current user tile through asynchronous GetUserImageAsync() and SetUserImageAsync() methods of the UserInformation object.

In my demo application, I get the user tile from her profile, rotate it by 90° and display it to the user:

image

After user taps (selects) the image, she is first prompted for confirmation:

image

And if user confirms that (she can opt out by clicking somewhere outside of the dialog), the new image is set as her new user tile.

image

Quick tip: if you're using your Windows Live ID as your Windows 8 login, changing your user tile will change your general Windows Live display picture as well (in Windows Live Messenger, Live Profile, etc.)

The code for dealing with images is a bit messy – I got it working but I suspect this will get easier as we progress towards the final runtime bits:

Read the user tile, rotate it by 90° and set as the Image source:

public async void SetProfileImage()
{
    StorageFile file = UserInformation.GetUserImage(UserImageKind.LargeBitmap);
    BitmapDecoder decoder = await BitmapDecoder.CreateAsync(await file.OpenAsync(FileAccessMode.Read));
    BitmapTransform transform = new BitmapTransform();
    transform.Rotation = BitmapRotation.Clockwise90Degrees;
    PixelDataProvider pixelData = await decoder.GetPixelDataAsync(BitmapPixelFormat.Rgba8, decoder.BitmapAlphaMode, transform, ExifOrientationMode.RespectExifOrientation, ColorManagementMode.DoNotColorManage);
    WriteableBitmap bitmap = new WriteableBitmap((int)decoder.PixelWidth, (int)decoder.PixelHeight);
    pixelStream = bitmap.PixelBuffer.AsStream();
    pixelStream.Seek(0, SeekOrigin.Begin);
    pixelBuffer = pixelData.DetachPixelData();
    pixelStream.Write(pixelBuffer, 0, (int)pixelStream.Length);
    bitmap.Invalidate();

    Viewer.Source = bitmap;
}

Get the image from Image source, save it to a temporary file, set the user tile and delete the temporary file:

private async void SetUserTile()
{
    WriteableBitmap bitmap = Viewer.Source as WriteableBitmap;

    StorageFile file = await Windows.Storage.ApplicationData.Current.TemporaryFolder.CreateFileAsync("temp");
    BitmapEncoder encoder = await BitmapEncoder.CreateAsync(BitmapEncoder.PngEncoderId, await file.OpenAsync(FileAccessMode.ReadWrite));
    encoder.SetPixelData(BitmapPixelFormat.Rgba8, BitmapAlphaMode.Straight, (uint)bitmap.PixelWidth, (uint)bitmap.PixelHeight, 72.0, 72.0, pixelBuffer);
    await encoder.FlushAsync();
    await Windows.System.UserProfile.UserInformation.SetUserImageAsync(file);
    await file.DeleteAsync();
}

Noticed a lot of asynchronous / await calls? Plenty of those in WinRT Winking smile

There’s still many quirks and missing bits around the User Tile Provider declaration implementation, it’s obviously not complete yet. But the ability to provide users with your own application to change their user tiles just feels overwhelming. I bet we’ll get some pretty creative applications in this space when Windows 8 marketplace ships.