Andrej Tozon's blog

In the Attic

NAVIGATION - SEARCH

NTK 2015: Slides from my intro talk on IoT and “Smart Home”

First of all, I’d like to thank everybody who attended my introductory talk at this year’s NT Konferenca (celebrating 20th anniversary this year – and back to Portorož venue).

I’ve talked about my smart home wiring and how I’m able to manage it from inside and outside my home network using my Windows Phone and Surface 2 RT. How various sensors and switches are connected to the main bus and are communicating with the actuators that control the lights, outlets, valves, blinds, etc. How little & cheap devices can help us connect our home devices to the Internet.

SurfaceHome
[Very early version of my Windows app, running on Surface 2 RT provides me a dashboard to monitor AND control my home]

My talk also aimed to feature a very simplified version of the above app (with simulating sensors instead of reading actual values) running on the Raspberry Pi. Unfortunately, due to the lack of HDMI->VGA adapters, I couldn’t show actual UI from Pi’s video output, but the app worked flawlessly otherwise (with Visual Studio 2015 debugger attached to the app running on the Pi).

Problems aside, we were able to monitor faked sensor data that was sent by the Pi to the web app and then relayed, in real time - thanks to SignalR running on Microsoft Azure – to a simple UWP monitoring app running on a Windows 10 desktop.

I’ve also shown a UI-less version of that same app, running on the Pi in headless mode (a kind of Windows service-ish mode), which I hope proved that Raspberry Pi running Windows 10 makes one very very powerful combo. Even if Windows 10 IoT Core Is currently still way from being final and it’s going to improve on its way to the release.

Some more info in the following slides…

Going forward, I’m exploring the possibilities of the internet and cloud-stored data. Computing power that it can give you. Analysis. Learning. Reaction.

What I’m learning right now is finding the right balance between private and cheap.

Highlighting search results within Windows Store apps

Download source code

Guidelines and checklist for search page for Windows Store apps (formerly Metro) suggest using hit highlighting to “indicate why a search result matches the [search] query”, as displayed on this screenshot (taken from the linked page):

That’s a great way to show the user why results are returned from the search query, but how do you implement that?

I already hinted at the suggested approach in my previous post, where I wrote about bindable Runs. Using the same technique, the hit highlighting guideline can be implemented pretty easily.

Let’s see how.

I’ve started out with a default Windows Store Grid app template, which provides the conveniently built-in sample data source. That’s the source we’re going to search through.

image

Of course we’ll need to implement the Search contract: Project –> Add New Item –> Search Contract. That will add the search results page to the project and put search activation code snippet into the App class.

image

The details for searching through the sample data source is yours to implement(a sample is included in provided source code).

Now for the relevant part.

The trick is to create a binding service that would take 3 input parameters:

1. Full text that contains the highlighted part,
2. Search text,
3. (Optional) highlight brush.

The service would extend the TextBlock control by clearing all its inlines and replacing them with a new set of Runs that will compose the new, highlighted text.

I’ve created a service that exposes these three parameters as dependency properties, this is the relevant code that executes when either full or highlighted text changes (find full implementation in the provided source code):

private static void OnTextChangedCallback(DependencyObject d, DependencyPropertyChangedEventArgs e)
{
    TextBlock textBlock = d as TextBlock;
    if (textBlock == null)
    {
        return;
    }
    string fullText = GetFullText(textBlock);
    string highlightedText = GetHighlightedText(textBlock);

    if (string.IsNullOrEmpty(fullText) || highlightedText == null)
    {
        return;
    }

    Brush brush = GetHighlightBrush(textBlock) ?? new SolidColorBrush(Windows.UI.Colors.Red);

    highlightedText = highlightedText.Substring(1, highlightedText.Length - 2);

    int length = highlightedText.Length;
    int lastIndex = 0;
    int index = fullText.IndexOf(highlightedText, 0, StringComparison.CurrentCultureIgnoreCase);

    textBlock.Inlines.Clear();
    while (index >= 0)
    {
        textBlock.Inlines.Add(new Run { Text = fullText.Substring(lastIndex, index - lastIndex) });
        textBlock.Inlines.Add(new Run { Text = fullText.Substring(index, length), Foreground = brush });
        lastIndex = index + length;
        index = fullText.IndexOf(highlightedText, lastIndex, StringComparison.CurrentCultureIgnoreCase);
    }
    textBlock.Inlines.Add(new Run { Text = fullText.Substring(lastIndex) });
}

To use this binding service, open StandardStyles.xaml (found in the Common folder) and search for the StandardSmallIcon300x70ItemTemplate style. This style is used to display the items in the search results page. You’ll find three TextBlocks in there – one for Title, one for Subtitle and the last one displays the Description. Instead of binding to Text property, wire those TextBlocks to the new binding service:

<TextBlock ifs:BindingService.FullText="{Binding Title}" ifs:BindingService.HighlightedText="{Binding DataContext.QueryText, ElementName=resultsPanel}" ifs:BindingService.HighlightBrush="#d9001f" Style="{StaticResource BodyTextStyle}" TextWrapping="NoWrap"/>
<TextBlock ifs:BindingService.FullText="{Binding Subtitle}" ifs:BindingService.HighlightedText="{Binding DataContext.QueryText, ElementName=resultsPanel}" ifs:BindingService.HighlightBrush="#d9001f"  Style="{StaticResource BodyTextStyle}" Foreground="{StaticResource ApplicationSecondaryForegroundThemeBrush}" TextWrapping="NoWrap"/>
<TextBlock ifs:BindingService.FullText="{Binding Description}" ifs:BindingService.HighlightedText="{Binding DataContext.QueryText, ElementName=resultsPanel}" ifs:BindingService.HighlightBrush="#d9001f"  Style="{StaticResource BodyTextStyle}" Foreground="{StaticResource ApplicationSecondaryForegroundThemeBrush}" TextWrapping="NoWrap"/>

And you’re done Smile

image

Download source code

Windows Phone 8 and our “localized” keyboard layout

This is a rant (somewhat).

Windows 8 features a nicely convenient on-screen keyboard, which is mostly useful when using on a touch device, like a tablet. I’m quite often using it on my Surface, when my touch cover is not attached.

Now, let’s take a look at a Slovenian layout of this keyboard:

win8keyboard

The keyboard layout is QUERTZ, with South Slavic layout, standardized in the 80’s and used in Slovenia, Croatia, Serbia, Bosnia and other (at that time) republics of former Yugoslavia. That means there are five additional letters on there. Letters č, š and ž (circled green) are part of all South Slavic alphabets, while đ and ć (circled red) are not in Slovenian alphabet.

Although this is a Slovenian keyboard layout, the presence of non-Slovenian characters is far from annoying or discomforting – besides the fact that there are also other (English) characters present, we’re used to this layout and have adopted it a long time ago, plus sometimes those characters come in rather handy.

But again, those red characters are not part of Slovenian language and that’s why I was surprised to see the Slovenian on-screen keyboard on my Windows Phone 8 (taken on my Nokia Lumia 920):

wp8keyboard1

It struck me weird that Microsoft would, out of five Slavic characters, pick the two that are not part of the Slovenian alphabet.

Taking another look at the above Windows 8 keyboard layout - notice how š and č are right next to  p and l? Wouldn’t it be natural to take this exact layout  to the Phone keyboard? So now, out of 28 letters on Windows Phone keyboard, there are 6 of them that aren’t in Slovenian alphabet – q, w, y, x (English), and ć, đ (Croatian/Serbian Latin/Bosnian).

Weird.

Of course, you can also (besides typing a combo of c and ˇ) access all letters by pressing and holding down the base letter, which gives you more options – and - behold č as the first option:

wp8keyboard2

Weird.

Fix please?

Variable-sized grid items in Windows 8 apps

This is a screenshot of the Windows 8 Store app:

image

And this is what you get when you start a new Windows 8 “Windows Store Grid App”:
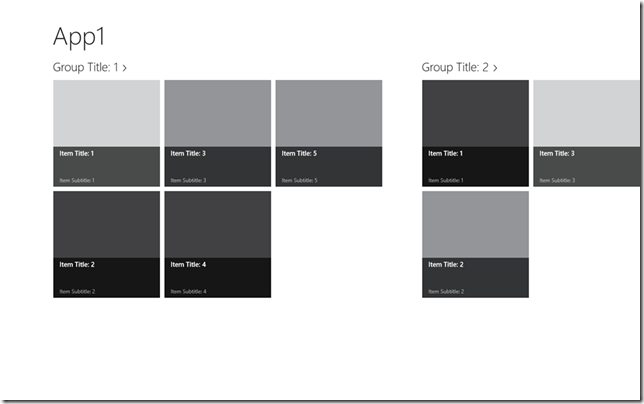
image_3

Wouldn’t it be great if you would be able to control the size of each particular item in your grid? To break out from dullness of having all items the same size, like, for example, to emphasize featured items; or for just any other reason?

Turns out you can do that (quite easily). I came about to this blog post describing one way to do it: “Windows 8 Beauty Tip: Using a VariableSizedWrapGrid in a GridView makes Grids Prettier” by Jerry Nixon. Reading it, I thought there had to be some easier way to do it than subclassing a GridView just for this.

And it turned out there was. Or at least it would be, if Windows 8 XAML supported Style Bindings like Silverlight 5. Not having that, the solution required that extra step that would allow binding to properties from within declared styles.

So what’s the idea?

Looking at GridView’s GroupStyle ItemsPanelTemplate after creating a new, default, Windows Store Grid App, it’s already set to VariableSizedWrapGrid – exactly what I needed. Now you just have to set its ItemWidth and ItemHeight properties to 250, and at the same time, remove those explicit sizes from the Standard250x250ItemTemplate (found in StandardStyles.Xaml). This puts GridView in control of sizing the GridViewItems.

The next step is adapting the model with extra two properties that will hold the horizontal and vertical spanning values. For this, you have to extend the provided SampleDataItem class with two new properties:

private int _horizontalSize = 1;
public int HorizontalSize
{
    get { return this._horizontalSize; }
    set { this.SetProperty(ref this._horizontalSize, value); }
}

private int _verticalSize = 1;
public int VerticalSize
{
    get { return this._verticalSize; }
    set { this.SetProperty(ref this._verticalSize, value); }
}

The default value for both is 1, which means, each item should occupy one unit of the grid only. HorizontalSize of 2 should span 2 columns, and VerticalSize of 2 should span 2 rows. Having both properties set to 2 would of course make the item occupy four units of the grid (2x2).

For this example, I only made the first item bigger.

If Windows 8 apps supported Binding from styles, I would easily finish this off by creating a new Style like:

<Style x:Key="VariableGridViewItemStyle" TargetType="GridViewItem">
  <Setter Property="VariableSizedWrapGrid.ColumnSpan" Value="{Binding HorizontalSize}" />
  <Setter Property="VariableSizedWrapGrid.RowSpan" Value="{Binding VerticalSize}" />
</Style>

… and set this style as GridView’s ItemContainerStyle.

Unfortunately, such binding is not yet supported, so I had to find some other way to do it.

Delay’s code to the rescue! It’s a complete (and short) solution that does exactly what I needed and it just works. I had to adapt it to suit WinRT and its new reflection model a bit, but at its core it stayed the same.

Here’s the adapted style that can bind to my properties through modified Delay’s helper:

<Style x:Key="VariableGridViewItemStyle" TargetType="GridViewItem">
    <Setter Property="local:SetterValueBindingHelper.PropertyBinding">
        <Setter.Value>
            <local:SetterValueBindingHelper>
                <local:SetterValueBindingHelper
                    Type="VariableSizedWrapGrid"
                    Property="ColumnSpan"
                    Binding="{Binding HorizontalSize}" />
                <local:SetterValueBindingHelper
                    Type="VariableSizedWrapGrid"
                    Property="RowSpan"
                    Binding="{Binding VerticalSize}" />
            </local:SetterValueBindingHelper>
        </Setter.Value>
    </Setter>
</Style>

After applying this change, the result can effectively be observed in Visual Studio 2012 (thanks XAML Editor Smile), and here’s how the app looks when running:
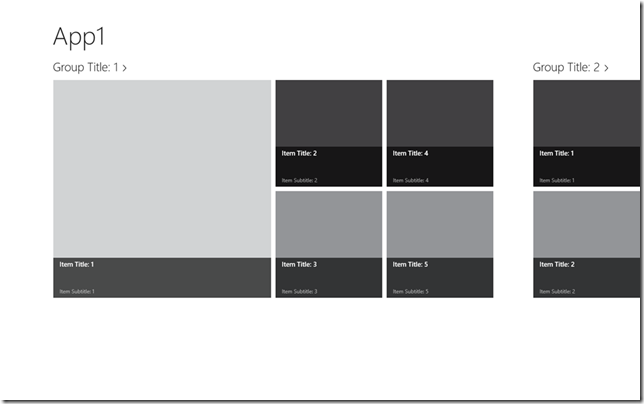
image_4

I like this approach because it’s XAML-only - it doesn’t force me to use a derived control and I can specify the sizing properties I want to bind to through my style resource. Which makes the solution a bit more flexible. The downside is of course this requirement of having a Style binding helper class, but I really really hope the Windows 8 gets this built in ASAP.

To close, here’s the modified version of Delay’s SetterValueBindingHelper (not really tested yet!):

public class SetterValueBindingHelper
{
    /// <summary>
    /// Optional type parameter used to specify the type of an attached
    /// DependencyProperty as an assembly-qualified name, full name, or
    /// short name.
    /// </summary>
    [SuppressMessage("Microsoft.Naming", "CA1721:PropertyNamesShouldNotMatchGetMethods",
        Justification = "Unambiguous in XAML.")]
    public string Type { get; set; }

    /// <summary>
    /// Property name for the normal/attached DependencyProperty on which
    /// to set the Binding.
    /// </summary>
    public string Property { get; set; }

    /// <summary>
    /// Binding to set on the specified property.
    /// </summary>
    public Binding Binding { get; set; }

    /// <summary>
    /// Collection of SetterValueBindingHelper instances to apply to the
    /// target element.
    /// </summary>
    /// <remarks>
    /// Used when multiple Bindings need to be applied to the same element.
    /// </remarks>
    public Collection<SetterValueBindingHelper> Values
    {
        get
        {
            // Defer creating collection until needed
            if (null == _values)
            {
                _values = new Collection<SetterValueBindingHelper>();
            }
            return _values;
        }
    }

    private Collection<SetterValueBindingHelper> _values;

    /// <summary>
    /// Gets the value of the PropertyBinding attached DependencyProperty.
    /// </summary>
    /// <param name="element">Element for which to get the property.</param>
    /// <returns>Value of PropertyBinding attached DependencyProperty.</returns>
    [SuppressMessage("Microsoft.Design", "CA1011:ConsiderPassingBaseTypesAsParameters",
        Justification = "SetBinding is only available on FrameworkElement.")]
    public static SetterValueBindingHelper GetPropertyBinding(FrameworkElement element)
    {
        if (null == element)
        {
            throw new ArgumentNullException("element");
        }
        return (SetterValueBindingHelper) element.GetValue(PropertyBindingProperty);
    }

    /// <summary>
    /// Sets the value of the PropertyBinding attached DependencyProperty.
    /// </summary>
    /// <param name="element">Element on which to set the property.</param>
    /// <param name="value">Value forPropertyBinding attached DependencyProperty.</param>
    [SuppressMessage("Microsoft.Design", "CA1011:ConsiderPassingBaseTypesAsParameters",
        Justification = "SetBinding is only available on FrameworkElement.")]
    public static void SetPropertyBinding(FrameworkElement element, SetterValueBindingHelper value)
    {
        if (null == element)
        {
            throw new ArgumentNullException("element");
        }
        element.SetValue(PropertyBindingProperty, value);
    }

    /// <summary>
    /// PropertyBinding attached DependencyProperty.
    /// </summary>
    public static readonly DependencyProperty PropertyBindingProperty =
        DependencyProperty.RegisterAttached(
            "PropertyBinding",
            typeof (SetterValueBindingHelper),
            typeof (SetterValueBindingHelper),
            new PropertyMetadata(null, OnPropertyBindingPropertyChanged));

    /// <summary>
    /// Change handler for the PropertyBinding attached DependencyProperty.
    /// </summary>
    /// <param name="d">Object on which the property was changed.</param>
    /// <param name="e">Property change arguments.</param>
    private static void OnPropertyBindingPropertyChanged(DependencyObject d, DependencyPropertyChangedEventArgs e)
    {
        // Get/validate parameters
        var element = (FrameworkElement) d;
        var item = (SetterValueBindingHelper) (e.NewValue);

        if ((null == item.Values) || (0 == item.Values.Count))
        {
            // No children; apply the relevant binding
            ApplyBinding(element, item);
        }
        else
        {
            // Apply the bindings of each child
            foreach (var child in item.Values)
            {
                if ((null != item.Property) || (null != item.Binding))
                {
                    throw new ArgumentException(
                        "A SetterValueBindingHelper with Values may not have its Property or Binding set.");
                }
                if (0 != child.Values.Count)
                {
                    throw new ArgumentException(
                        "Values of a SetterValueBindingHelper may not have Values themselves.");
                }
                ApplyBinding(element, child);
            }
        }
    }

    /// <summary>
    /// Applies the Binding represented by the SetterValueBindingHelper.
    /// </summary>
    /// <param name="element">Element to apply the Binding to.</param>
    /// <param name="item">SetterValueBindingHelper representing the Binding.</param>
    private static void ApplyBinding(FrameworkElement element, SetterValueBindingHelper item)
    {
        if ((null == item.Property) || (null == item.Binding))
        {
            throw new ArgumentException(
                "SetterValueBindingHelper's Property and Binding must both be set to non-null values.");
        }

        // Get the type on which to set the Binding
        Type type = null;
        TypeInfo typeInfo = null;
        if (null == item.Type)
        {
            // No type specified; setting for the specified element
            type = element.GetType();
            typeInfo = type.GetTypeInfo();
        }
        else
        {
            // Try to get the type from the type system
            type = System.Type.GetType(item.Type);
            if (null == type)
            {
                // Search for the type in the list of assemblies
                foreach (var assembly in AssembliesToSearch)
                {
                    // Match on short or full name
                    typeInfo = assembly.DefinedTypes
                        .Where(t => (t.FullName == item.Type) || (t.Name == item.Type))
                        .FirstOrDefault();
                    if (null != typeInfo)
                    {
                        // Found; done searching
                        break;
                    }
                }
                if (null == typeInfo)
                {
                    // Unable to find the requested type anywhere
                    throw new ArgumentException(string.Format(CultureInfo.CurrentCulture,
                                                              "Unable to access type \"{0}\". Try using an assembly qualified type name.",
                                                              item.Type));
                }
            }
            else
            {
                typeInfo = type.GetTypeInfo();
            }
        }
        
        // Get the DependencyProperty for which to set the Binding
        DependencyProperty property = null;
        var field = typeInfo.GetDeclaredProperty(item.Property + "Property"); // type.GetRuntimeField(item.Property + "Property");
        if (null != field)
        {
            property = field.GetValue(null) as DependencyProperty;
        }
        if (null == property)
        {
            // Unable to find the requsted property
            throw new ArgumentException(string.Format(CultureInfo.CurrentCulture,
                                                      "Unable to access DependencyProperty \"{0}\" on type \"{1}\".",
                                                      item.Property, type.Name));
        }

        // Set the specified Binding on the specified property
        element.SetBinding(property, item.Binding);
    }

    /// <summary>
    /// Returns a stream of assemblies to search for the provided type name.
    /// </summary>
    private static IEnumerable<Assembly> AssembliesToSearch
    {
        get
        {
            // Start with the System.Windows assembly (home of all core controls)
            yield return typeof(Control).GetTypeInfo().Assembly;
        }
    }
}

Announcing a new user group

Dear Slovenian developers and UI enthusiasts, mark your calendars for 8th of November 2011 as that’s the day we’re launching a new user group targeting the UI/UX professionals.

SIUX LogoSIUX – Slovenian UX User Group – a sister user group (or a Siamese twin group as we fondly call it Smile) of now years-running SLODUG, Slovenian Developers User Group (SLODUG), where we’ll focus on technologies and areas like WPF, Silverlight, HTML5, Kinect, Windows Phone, Windows 8; talk through their visual and interaction design aspects; explore user interface examples, usability and related factors.

SLODUG and SIUX will share their members and meeting place. As mentioned, the first, inaugural meeting, will take place on Tuesday, 8th of November 2011, starting at 17h. Two talks are scheduled for the meeting: Developing for XBox Kinect by Sašo Zagoranski and Metro: the UI of the future?  by me. The meeting will take place in Microsoft Lecture room at Šmartinska 140.

Full agenda:

17:00: Intro & announcements
17:15 – 18:00: Developing for XBox Kinect, Sašo Zagoranski / Semantika d.o.o.
18:15 – 19:00: Metro: UI of the future?, Andrej Tozon / ANT Andrej Tozon s.p.
19:00: Discussion over pizza &  beer

We’re also looking for speakers – if you’re interested or  know anybody from the field, please contact me and we’re schedule your talk in one of our next meetings.

Hope to see you!

Until then, you can follow us on Twitter or join our Facebook group.


Windows 8 Metro declarations: User Tile Provider

This blog post is part of my Windows 8 metro-style application declarations series. Read more about declarations in the introductory post about application manifest.

User Tile Provider declaration allows you to register your application as a user tile provider. That means that user will be able to use your application to change her user tile.

One of many ways of changing the user tile can is by clicking your personal tile (avatar) on Windows 8 Start screen – four options are currently displayed, one of them is “Change user tile”:

image

Selecting the first option will take you to Control Panel’s Personalize page, set on User Tile:

image

2 options for changing the tile already available: the user can browse through her pictures and select the one that she likes or she can take a new one with the help of her web cam.

Your own application as a user tile provider

As with other declarations, you declare your application as a user tile provider in the application manifest. The easiest way to do that is through the manifest editor. You’ll see that when you add the User Tile Provider declaration to the Supported Declarations list, there are no declaration specific options to be set.

image

That’s good. After setting the declaration, run or just deploy your application and return to the Control Panel. You should now be looking at something like this:

image

Your application is now registered as the official user tile provider and by clicking on the application tile it will be launched.

And fail.

Of course, there is some wiring you have to do in your code to make this work properly.

Wiring the application logic

There isn’t a special kind of activation reserved for this type of activation, it’s activated through the special Protocol activation - I covered Protocol activation before – if you set up Protocol activation as described in that blog post, you can check for specific protocol in the OnProtocolActivated handler; you’ll see that Uri, passed in through provided arguments, looks something like UserTileProvider://, so you just have to check for a particular protocol to see how or why your application was invoked:

private void OnProtocolActivated(ProtocolActivatedEventArgs args)
{
    if (args.Uri.Scheme == "usertileprovider")
    {
        PhotoView page = new PhotoView();
        page.SetProfileImage();
        Window.Current.Content = page;
        Window.Current.Activate();
        return;
    }

    // ... other protocol handlers
}

Here I’m bringing up a new PhotoView page (also discussed in my previous blog post) whenever my application is invoked for choosing a user tile.

Changing the user tile

OK, so application now responds to the user tile change call. But how do we actually change the tile? Well, there’s an API for that. You can get and set current user tile through asynchronous GetUserImageAsync() and SetUserImageAsync() methods of the UserInformation object.

In my demo application, I get the user tile from her profile, rotate it by 90° and display it to the user:

image

After user taps (selects) the image, she is first prompted for confirmation:

image

And if user confirms that (she can opt out by clicking somewhere outside of the dialog), the new image is set as her new user tile.

image

Quick tip: if you're using your Windows Live ID as your Windows 8 login, changing your user tile will change your general Windows Live display picture as well (in Windows Live Messenger, Live Profile, etc.)

The code for dealing with images is a bit messy – I got it working but I suspect this will get easier as we progress towards the final runtime bits:

Read the user tile, rotate it by 90° and set as the Image source:

public async void SetProfileImage()
{
    StorageFile file = UserInformation.GetUserImage(UserImageKind.LargeBitmap);
    BitmapDecoder decoder = await BitmapDecoder.CreateAsync(await file.OpenAsync(FileAccessMode.Read));
    BitmapTransform transform = new BitmapTransform();
    transform.Rotation = BitmapRotation.Clockwise90Degrees;
    PixelDataProvider pixelData = await decoder.GetPixelDataAsync(BitmapPixelFormat.Rgba8, decoder.BitmapAlphaMode, transform, ExifOrientationMode.RespectExifOrientation, ColorManagementMode.DoNotColorManage);
    WriteableBitmap bitmap = new WriteableBitmap((int)decoder.PixelWidth, (int)decoder.PixelHeight);
    pixelStream = bitmap.PixelBuffer.AsStream();
    pixelStream.Seek(0, SeekOrigin.Begin);
    pixelBuffer = pixelData.DetachPixelData();
    pixelStream.Write(pixelBuffer, 0, (int)pixelStream.Length);
    bitmap.Invalidate();

    Viewer.Source = bitmap;
}

Get the image from Image source, save it to a temporary file, set the user tile and delete the temporary file:

private async void SetUserTile()
{
    WriteableBitmap bitmap = Viewer.Source as WriteableBitmap;

    StorageFile file = await Windows.Storage.ApplicationData.Current.TemporaryFolder.CreateFileAsync("temp");
    BitmapEncoder encoder = await BitmapEncoder.CreateAsync(BitmapEncoder.PngEncoderId, await file.OpenAsync(FileAccessMode.ReadWrite));
    encoder.SetPixelData(BitmapPixelFormat.Rgba8, BitmapAlphaMode.Straight, (uint)bitmap.PixelWidth, (uint)bitmap.PixelHeight, 72.0, 72.0, pixelBuffer);
    await encoder.FlushAsync();
    await Windows.System.UserProfile.UserInformation.SetUserImageAsync(file);
    await file.DeleteAsync();
}

Noticed a lot of asynchronous / await calls? Plenty of those in WinRT Winking smile

There’s still many quirks and missing bits around the User Tile Provider declaration implementation, it’s obviously not complete yet. But the ability to provide users with your own application to change their user tiles just feels overwhelming. I bet we’ll get some pretty creative applications in this space when Windows 8 marketplace ships.


Windows 8 Metro declarations: Protocol

I touched on the Metro-style application declarations in my previous blog entry where I wrote about application manifest. I’m continuing the series with exploring the currently available declarations, starting with Protocol. I’ll be using C# Windows Metro style application samples throughout the whole series.

I imagined an application that would respond to the specific URL requests. Let’s say that invoking a URL like “locx://aerial/47.639747~-122.129731” should show me an aerial map, centered to a geographical point of (47.639747, -122.129731).

Displaying a Map

Let’s first figure out how to display the map. There isn’t any native WinRT maps component yet, so the simplest way to display a map is using Bing maps in a WebView Xaml control. WebView is a control that can display HTML, either passed in by string or by navigating to actual web site. Think of it as a very lightweight WebBrowser control, without all the chrome and other clutter.

So I put a WebView control on the MainPage, made sure it fills the whole page and altered its default constructor a bit:

public MainPage()
{
    InitializeComponent();
    WebView.Navigate(new Uri("http://www.bing.com/maps"));
}

Run the application – it should display a nice map of the world. If you have a touch screen, try manipulating the map with your fingers – it' feels nice Winking smile

Metro-style application can be configured to handle any URL protocol

Back to the subject. Open the application manifest configuration screen and navigate to the Declarations tab. Open the Available Declarations dropdown and select Protocol. The protocol will be added to Supported Declarations list box when you click the Add button.

image

Handling declaration properties for Protocol is pretty simple. You’re only required to name the protocol you want your application to handle. For this example, I’m using “locx”.

An optional custom graphics can be used as an application icon whenever the protocol declaration association needs to be displayed to the user (e.g. Control Panel). If not set, application’s Logo image will be used.

Once configured, open App.xaml.cs and override the OnActivated method. This method will get called whenever application is activated. Because an application can be activated for the various reasons, you have to check against the passed arguments for the specific activation kind.

protected override void OnActivated(IActivatedEventArgs args)
{
    if (args.Kind == ActivationKind.Protocol)
    {
        OnProtocolActivated((ProtocolActivatedEventArgs)args);
    }
}

When application is Protocol-activated, the activation arguments should be of the ProtocolActivatedEventArgs type and it should be safe to cast to that. I’ve created the OnProtocolActivated method to handle those cases separately. Note that some other activation scenarios have their equivalent activation methods already built in.

In the OnProtocolActivated method, you’ll have to resolve the Uri that was used for activation. I declared the following Uri format: locx://[view]/[latitude]~[longitude], where view is either roads or aerial. Here’s the method that parses the Uri and calls a specific constructor of the MainPage. That latitude and longitude should be provided using the currently set culture format (commas vs. dots) so they could be parsed into doubles.

private void OnProtocolActivated(ProtocolActivatedEventArgs args)
{
    string type = args.Uri.Host;
    double lat;
    double lng;

    string[] latlng = args.Uri.LocalPath.Substring(1).Split(new[] { "~" }, StringSplitOptions.RemoveEmptyEntries);

    if (latlng.Length != 2 || !double.TryParse(latlng[0], out lat) || !double.TryParse(latlng[1], out lng))
    {
        Exit();
        return;
    }

    Window.Current.Content = new MainPage(type, lat, lng);
    Window.Current.Activate();
}

In overridden MainPage constructor, a Bing maps query is composed and navigated to. Invariant culture is used to convert latitude and longitude to the proper format.

public MainPage(string type, double lat, double lng)
{
    InitializeComponent();
    string uri = string.Format("http://www.bing.com/maps/default.aspx?cp={0}~{1}&lvl=10&style={2}", lat.ToString(CultureInfo.InvariantCulture), lng.ToString(CultureInfo.InvariantCulture), type.ToLower()[0]);
    WebView.Navigate(new Uri(uri));
}

Activation Registration

A very positive thing about activating declarations is that protocol registration will be done when you deploy the application to your computer. That means you don’t need to run the application (as in – the first time) to register the protocol. You can even choose that your application will only support activation and do nothing when launched the ordinary way.

After deploying, you can test your application by invoking the following link from the command line (or Run prompt):

image

image

Of course application will handle any subsequent protocol requests while it’s already running too.

Metro-style application declarations promise a simple integration with the OS through predefined contracts, Protocol is just one of those extensibility points. I’ll look into others in my next posts.


First look at Windows 8 application as a developer

It’s been a couple of days since I installed the //build/ preview version of Windows 8 and in this short time I’ve grown to quite like it. It’s an interesting mix of the new Metro style and the “old” Windows 7-like style.

There were two things I’ve just had to install though, to make my life easier while working with Windows 8. The first thing was Total Commander, a file navigation alternative to Windows Explorer, and shortly after that, I installed “Mouse without borders”, the software KVM-like solution that lets you control multiple computers with a single set of keyboard and mouse, share clipboard etc. (for that I had to manually install .NET Framework 2.0 first, though).

The most confusing part about Windows 8 was the mixture of touch and mouse input. I installed Windows 8 on a touch-enabled notebook and was surprised that I could pan, zoom and drag things around, but couldn’t select apps. Tiles responded to tap, but apps just didn’t start and I had to use the mouse to click on them. I’m blaming the missing/incomplete drivers for that and expect it to be fixed by the time Windows 8 gets released. Once I got comfortable working around those issues, I started exploring the new Metro UI, mostly exploring my options for creating my own Metro application.

I took the default Weather application as the example. Funny thing is that at first I couldn’t find a way to change the temperature display to show Celsius instead of Fahrenheit. I started the app and started clicking all over it and eventually found out that right clicking anywhere on the screen (a Metro application takes up the whole screen unless it shares that space with other apps) brings up the Application bar (in touch world, the app bar is displayed by swiping up your finger from the bottom of screen).

image

Application bar

Similar to Windows Phone, Application bar is reserved for command and status buttons. One difference is that buttons are aligned to left and right edges instead of centered horizontally. This makes them easier to reach by your thumb fingers when holding a tablet.

Application bar hosts your command buttons that may change depending on the context - the state your application is in. You can also choose to include more system level commands such as the option to pin the application to the Start screen. Buttons you shouldn’t include in the Application bar are the ones for displaying application's settings and / or search pages. More on that later.

While application bar revealed some helpful options, there was no settings button to be found. Running around with the mouse I found a hot-spot on the bottom-left of the screen (where you’d expect the Start button to be on older Windows). Dragging my mouse to that corner revealed a Start-like menu with the “charm” options: Settings, Devices, Share, Search and Start (in touch world, charms are displayed when you swipe from the right edge towards center).

image   image

Great! Settings!

Settings and preferences

Turned out that settings charm took me to the settings pane that appeared on the right-hand side of the screen, offering me the following options:

  • Rate and Review the application (doesn’t currently work because Windows Store is not available yet),
  • Control system access for Weather (allows user to enable or disable the capabilities required by your application),
  • Weather preferences. That last one was key and the most difficult to find because it looked like some kind of group header. When I discovered that it was selectable, I got into the preferences page that allowed me to change application’s preferences.

image image

Preferences is also one of the custom Settings pages you can implement in your own application. There are a few settings commands you can add to the Settings pane that you map to specific pages, some of those being the About page, Preferences, Help and Privacy statement. From what I found out, only for Settings commands can be displayed in the Settings pane at once, but I’m not sure if that can change depending on your display resolution.

image

You don't need to worry when and how the Settings pane will be displayed, that all is handled by the OS, which means some less work for the developer and, perhaps more importantly, a unified experience across all Metro applications. You only need to implement the way Setting commands display application-specific pages (Preferences, About, etc.)

Search and Share


Search and Sharing contracts are implemented similar to Settings, but go additional step forward. If your application is going to support searching, you can hook up a Search pane, implement required event handlers and provide a custom results page. For Sharing, that would mean to implement the sharing logic. It looks like all application can share their screenshot by default (even if you don’t implement the sharing contract).

image    image

One bonus that Search and Sharing contract provide over Settings is that other applications can use your application as a search or share target. That means that from whichever other application user is currently using, she can search your application (or share her content through it) just by choosing it as a target from her current Search (or Share) pane.

There seems to be quite a few system hooks in Windows 8 that your Metro apps can connect to. Those mentioned above only happen to be the most exposed and accessible in the short run. Clearly it will take some time to get fully familiar with the new Runtime and OS integration and let’s not forget, we’re playing with the preview bits – anything can change in future versions.


Windows Phone Pivot and loading content

Rewatching the Windows Phone Application Performance MIX10 talk by Jeff Wilcox, I took a note of one particular part where he clearly answers a question I’ve been asked a few times by now already. This question is based around the confusing statement that Pivot controls are supposed to be lazy loading their content pages, in contrast to Panoramas, which, at startup, would load all pages at once. The part that confuses developers the most is that when they start debugging their apps, they find out that Pivots load all their pages at startup too! How come? Aren’t Pivots loading pages only when needed?

Jeff explains this very clearly (fast forward to approx. minute 25) : “So the instant you go to a page, we pop up the Pivot, we’ll load  the content there. … …  Trouble is, we need to load more, because we want to provide a smooth experience when you pivot around. So we’re actually also loading, right after that first page comes up, we’ll kick off a load for both items on the left and the right.

See Jeff’s talk on the Channel 9 site.

What this means is that if your Pivot has only 2 or 3 pages, the startup performance won’t be that much different than when using a Panorama. If those 3 content pages are heavy on the load, use a lot of bindings etc., you can get into trouble. In some cases, loading a single content page on startup (and the rest when pivoted to) might actually result in a better experience than preloading all 3 pages.

Is there a way to override the default Pivot behavior and load only one content page on startup?

Of course there is.

The trick is to create a user control for each content page (which is a good idea anyway) and start it off with a Pivot control by specifying empty pages:

<controls:Pivot Title="My Pivot"
                LoadingPivotItem="OnLoadingPivotItem">
    <controls:PivotItem Header="Page 1" />
    <controls:PivotItem Header="Page 2" />
    <controls:PivotItem Header="Page 3" />
</controls:Pivot>

The LoadingPivotItem event will fire each time the Pivot would load a new content page. From MSDN documentation: “[LoadingPivotItem is an] Event for offering an opportunity to dynamically load or change the content of a pivot item before it is displayed.”

What you do during this event is check whether the content is loaded yet and if it isn’t, kick off the load. Something like:

private void OnLoadingPivotItem(object sender, PivotItemEventArgs e)
{
    if (e.Item.Content != null)
    {
        // Content loaded already
        return;
    }

    Pivot pivot = (Pivot)sender;

    if (e.Item == pivot.Items[0])
    {
        e.Item.Content = new Page1Control();
    }
    else if (e.Item == pivot.Items[1])
    {
        e.Item.Content = new Page2Control();
    }
    else if (e.Item == pivot.Items[2])
    {
        e.Item.Content = new Page3Control();
    }
}

One thing to have in mind though: make sure that any data you want to display on those content pages are loaded on the background thread (again – always a good idea) to allow the pages to load as quickly as possible.


NTK 2011 Slides: Silverlight and NUI

I’m publishing the materials from my “Silverlight and NUI” talk from this year NT conference. The talk, where I took the time to dig a bit deeper into Silverlight multi-touch and web camera access capabilities, was part of the whole-day track, themed as “Building applications with NUI”.

[The slides are in Slovenian language]

During my talk, I made some references to the following applications and libraries:

And this is the source code of apps I’d shown: SilverlightNUI.zip:

TouchDemo: primary touch point are shown as blue ellipses, all secondary ones as orange. Pressing the ‘1’ key will bring floating red circles on the canvas – you can move them around if you like. The commented out code changes the behavior of touch events so the primary touch points are not propagated to mouse clicks.

TouchManipulations uses the above-referenced Multi-Touch behaviors that  let you move some pictures around. Keys ‘1’ and ‘2’ will bring up two rectangles that’ll stream your web cam feed, but in different manner: VIdeoBruh vs. ImageBrush with repeated Image captures. [Note: Images included are only placeholders – with the file length of 0 – you’ll have to replace them with proper files in order to run the demo]